|
JeVois
1.23
JeVois Smart Embedded Machine Vision Toolkit
|
|
|
JeVois
1.23
JeVois Smart Embedded Machine Vision Toolkit
|
|
JeVois expects a very specific organization of partitions (logical volumes) and files onto its MicroSD. In addition, two low-level bootloader (hardware startup) "files" must be present on the MicroSD card at specific physical locations (sectors). For this reasons, care must be taken when preparing a MicroSD card for use with JeVois.
The simplest approach is to download and flash a pre-configured JeVois disk image. Those are available at jevois.org and contain all the operating system, supporting data, and core JeVois software. After you have prepared a new MicroSD card using a JeVois disk image, you will be able to add new machine vision modules to it very easily using a laptop or desktop computer.
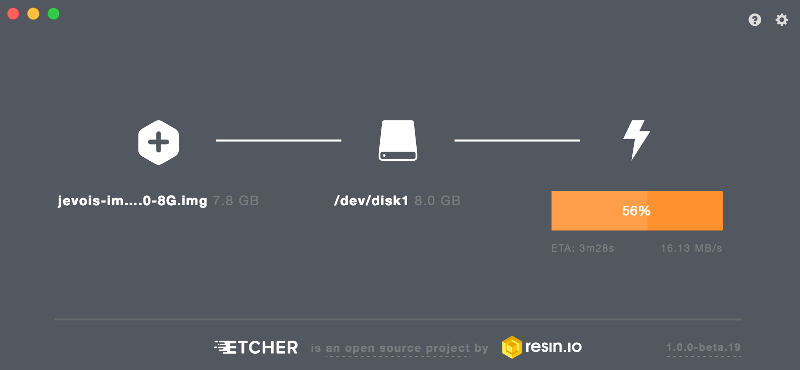
Etcher is a free an open-source program to burn disk images to USB drived and SD cards, which is cross-platform and provides an easy graphical interface that looks the same on Windows, Mac, and Linux.
Use these instructions if the easy flashing with Etcher, as described above, somehow does not work for you.
Any easy way on Linux is to use dd in a terminal. First, identify the device assigned to your SD card. On Ubuntu, go to your Ubuntu menu and type disks and then start the Disks program.
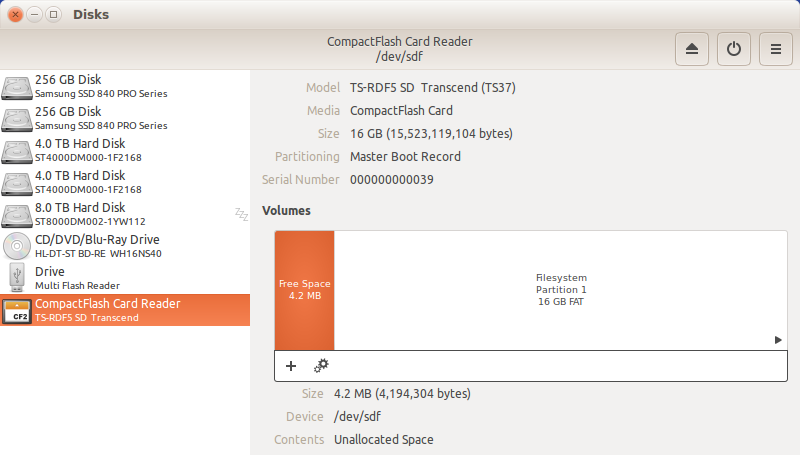
Click on the icon that most likely is your MicroSD card and examine carefully the information that is displayed, such as the size, brand name, etc. Once you are positive that this is your new MicroSD card, note the device name displayed towards the bottom. Here it is /dev/sdf and this is the name we will use to write the JeVois disk image to.
cd Downloads
wget http://jevois.org/data/jevois-image-latest-8G.zip
unzip jevois-image-latest-8G.zip
sudo dd if=jevois-image-1.0-8G.img of=/dev/sdX bs=1M  # exact .img file name may vary
sync
where you should replace sdX above by the name of the device that you noted in the previous step. Make sure you wait until the sync command (which flushes disk caches) is complete, otherwise not all the disk image data might have been committed to your MicroSD yet. You can now eject the MicroSD card and insert it into your JeVois smart camera.
For the dd command, if specifies the source file (or device), of specifies the destination file (or device), and bs is the block size to use.
Use these instructions if the easy flashing with Etcher, as described above, somehow does not work for you.
You can use USBWriter from https://sourceforge.net/p/usbwriter/wiki/Documentation/
You can also try the USB Image Tool or the Win32 Disk Imager
See instructions here for how to use these tools.
Use these instructions if the easy flashing with Etcher, as described above, somehow does not work for you.
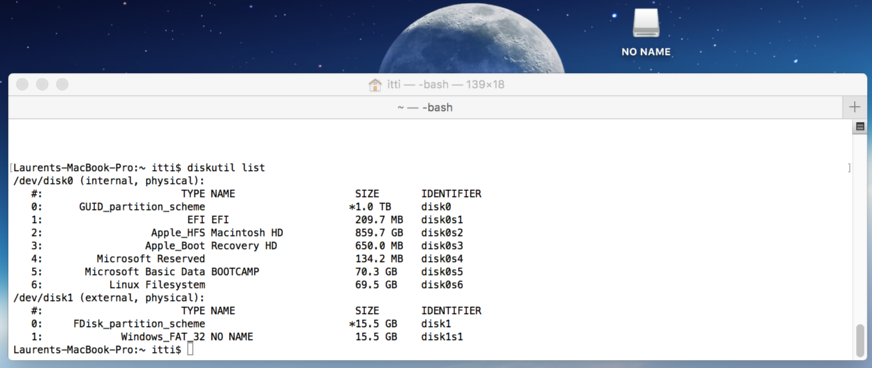
The easiest on Mac is to use dd in a terminal. First, identify the device assigned to your SD card. For that, open a Terminal (located in Applications -> Utilities -> Terminal), and type:
diskutil list
You should see something like what is shown below, revealing that our MicroSD card is assigned to /dev/disk1 on this particular mac:
Be sure to check the name and size as this is the device that we are now going to erase. In the terminal, type:
diskutil unmountDisk /dev/diskX
cd Downloads
wget http://jevois.org/data/jevois-image-latest-8G.zip
unzip jevois-image-latest-8G.zip
sudo dd if=jevois-image-1.0-8G.img of=/dev/diskX bs=1M # exact .img file name may vary
sync
where you should replace diskX above by the name of the device that you noted in the previous step. Make sure you wait until the sync command (which flushes disk caches) is complete, otherwise not all the disk image data might have been committed to your MicroSD yet. You can now eject the MicroSD card and insert it into your JeVois smart camera.
For the dd command, if specifies the source file (or device), of specifies the destination file (or device), and bs is the block size to use.
On Mac, you can also try the RPi SD card builder to flash your SD card.
In addition to the partitions and files that you can see, the JeVois MicroSD card also has two additional and essential "files" that are stored directly onto specific sectors (physical flash disk locations) on the card. These are two bootloader (system startup) files which are the first two files loaded when the JeVois embedded processor starts. Because the processor does not yet know about partitions, file systems, etc at that early startup stage, all it knows how to do is to read raw sectors from the SD card. You usually do not need to modify these two special files. But beware that if you want to copy the contents of one JeVois MicroSD card to a new card, you need to do a full physical sector-by-sector copy.
If you have customized a JeVois MicroSD card, for example installing many machine vision modules onto it, and you want to make a copy to another, new MicroSD card, proceed as follows:
On Linux and mac, you would use dd again, first to dump your existing MicroSD to a file on your desktop or laptop, and then we will write that file to the new MicroSD card:
For the dd command, if specifies the source file (or device), of specifies the destination file (or device), and bs is the block size to use.
On Windows, use USBWriter again.
Another way to create a MicroSD card for JeVois is to use the compilation and installation scripts provided with the JeVois development environment.
This allows you to install a custom kernel, custom hardware configuration, custom Linux installation with possibly new system libraries and programs, etc.
This is not recommended for novice users and is for Linux only. The procedure is detailed as part of the programmer manual.
For more information on this, see Programmer guide and in particular Programmer SDK and writing new modules.
 1.9.8
1.9.8
