JeVois Tutorials  1.20
JeVois Smart Embedded Machine Vision Tutorials
Share this page:
Hello JeVois using JeVois Inventor

This tutorial will show you how to create a simple machine vision module that runs on the JeVois smart camera, using the JeVois Inventor graphical user interface.
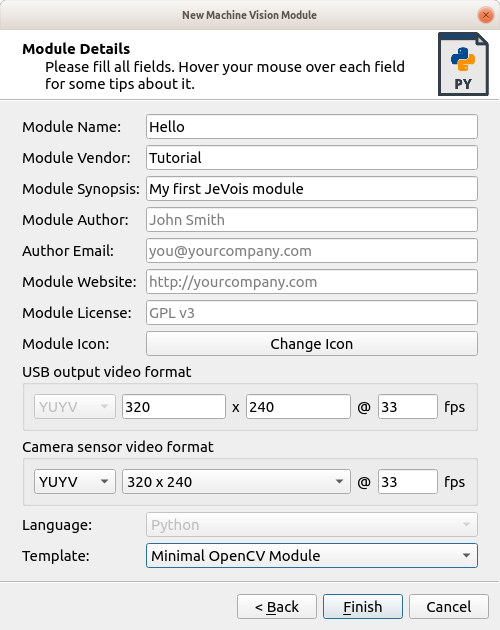
Getting started

Creating your first module

  • Select New Python Module... from the pull-down menu of JeVois Inventor (or press CTRL-N).
  • Fill in the details as shown below:

A few notes:

  • Module Name is the name of your module, and Vendor Name is used to group all the modules you create under a single directory.
  • Module name and Vendor name must begin with an uppercase letter.
  • Hover your mouse over each field to see some tips.
  • You need to provide at least the data shown in black font in the above screenshot. If you do not provide the data shown in gray font in the above, blank values will be used (not the sample suggested values in gray font). The gray values are just suggestions, but not defaults. So, even if you like those suggestions, you need to type them in (e.g., you need to type 320, 240, and 33 for the USB output video format to confirm that this is indeed what you want).
  • USB output video format is the video resolution and frame rate that JeVois will send to your host computer. This is the resolution that you want to use for the results of your machine vision algorithm.
  • Camera sensor video format is the resolution at which JeVois will capture images from its camera sensor.
  • The task of a (basic) JeVois machine vision module is: for each camera sensor image, create a USB output image.

When you click Finish, JeVois will restart. This is needed because JeVois will now add the new USB output video format as one of the formats that it can produce, but USB video cameras were not meant to be able to change their video formats at runtime. So we need to simulate a camera disconnect, and then a re-connect, for the host computer to request again the list of supported video resolutions from JeVois and to discover our new module.

  • After JeVois restarts, you should be able to select your new module from the Vision Module pull-down menu:
  • The module's code is pre-filled by default to run a simple Laplacian edge detector.

For more information:

Writing the code

Switch to the Code tab of JeVois Inventor. You will see an editor for Python code.

JeVois supports full Python 3.6, numpy, and OpenCV 3.4.0.

As mentioned above, our mission is to compute something interesting in the video frames captured by the JeVois camera sensor, and to create some result video frames that we can send to a host computer over the USB link.

The JeVois core software that runs in the smart camera takes care of all the hard details of capturing images from the sensor and of sending output images to the USB link. So what is left for us is to focus on the transformation from an input image to an output image.

A module that does not change the image, hence making JeVois behave like a regular USB webcam, would look like this:

import libjevois as jevois
import cv2
import numpy as np
class Hello:
def process(self, inframe, outframe):
img = inframe.getCvBGR()
outframe.sendCv(img)

The process() function of class Hello will be called by the JeVois core, for every video frame.

The parameter inframe of process() is a proxy to the next video frame from the camera. It allows us to request, possibly wait for, and eventually obtain the next frame captured by the camera sensor.

Likewise, the parameter outframe is a proxy to the next frame that will be sent to the host computer over the USB link.

In the above code, we basically:

  • Request the next video frame from the camera sensor, as a BGR image (blue, green, red - the format most commonly used by OpenCV) by calling inframe.getCvBGR()
  • Send that image to the host computer over USB by calling outframe.sendCv()

Try it for yourself:

  • In JeVois Inventor, select all the code with CTRL-A and delete it with DEL
  • Select all the above code and paste it into JeVois Inventor
  • Click Save To JeVois or press CTRL-S
  • You just transformed your smart JeVois Camera into a plain dumb camera!

But what about the hello part?

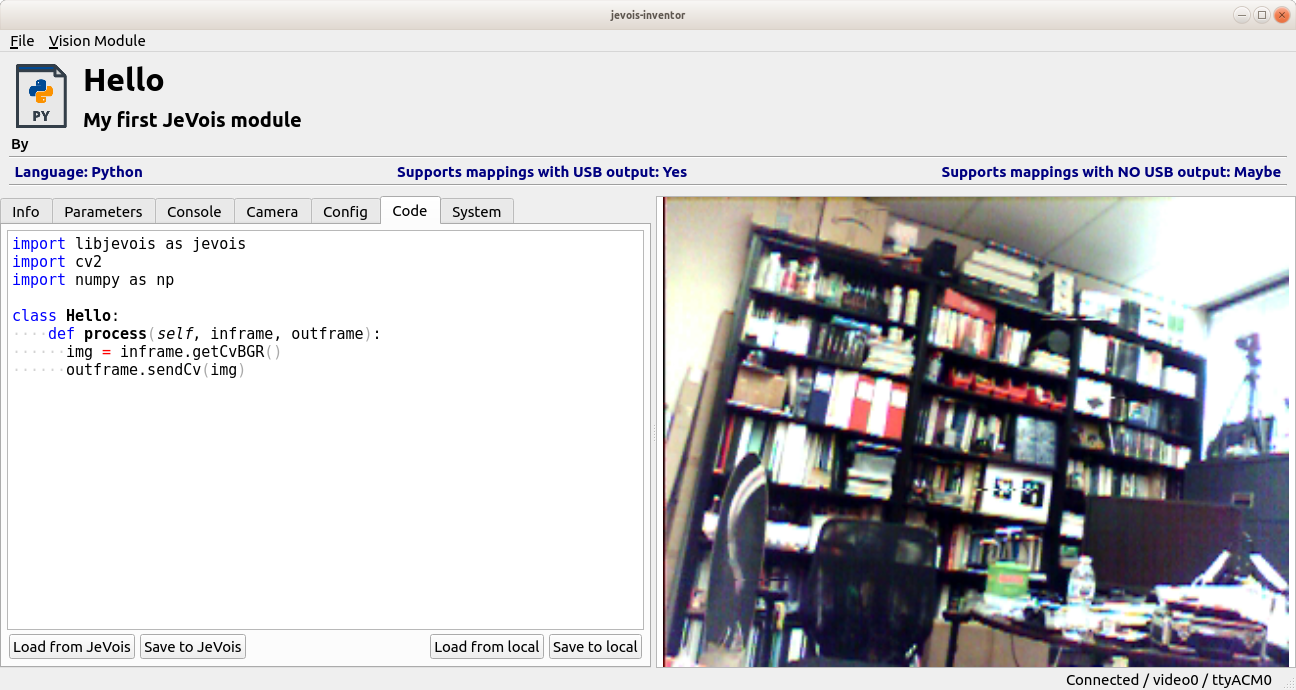
To start transitioning from plain to smart camera, let us see how we can make the output image different than the input image.

  • Images obtained from inframe.getCvBGR() are numpy arrays, which is what most OpenCV functions operate on.
  • Likewise for images that we send out using outframe.sendCv()
  • This means that, from the above code, we should be able to write our hello message by using some OpenCV function that writes text strings in images. A quick web search for opencv 3.4 write text python gets us to https://docs.opencv.org/3.4.0/dc/da5/tutorial_py_drawing_functions.html
  • Let's do like they do under Adding text to images:
import libjevois as jevois
import cv2
import numpy as np
class Hello:
def process(self, inframe, outframe):
img = inframe.getCvBGR()
font = cv2.FONT_HERSHEY_SIMPLEX
cv2.putText(img, 'Hello JeVois!', (10,100), font,
1, (255,255,255), 2, cv2.LINE_AA)
outframe.sendCv(img)
Note
The original example in the OpenCV docs used prefix cv. for OpenCV functions, but we use cv2. so remember to adjust code that you cut and paste accordingly.

What if I make mistakes?

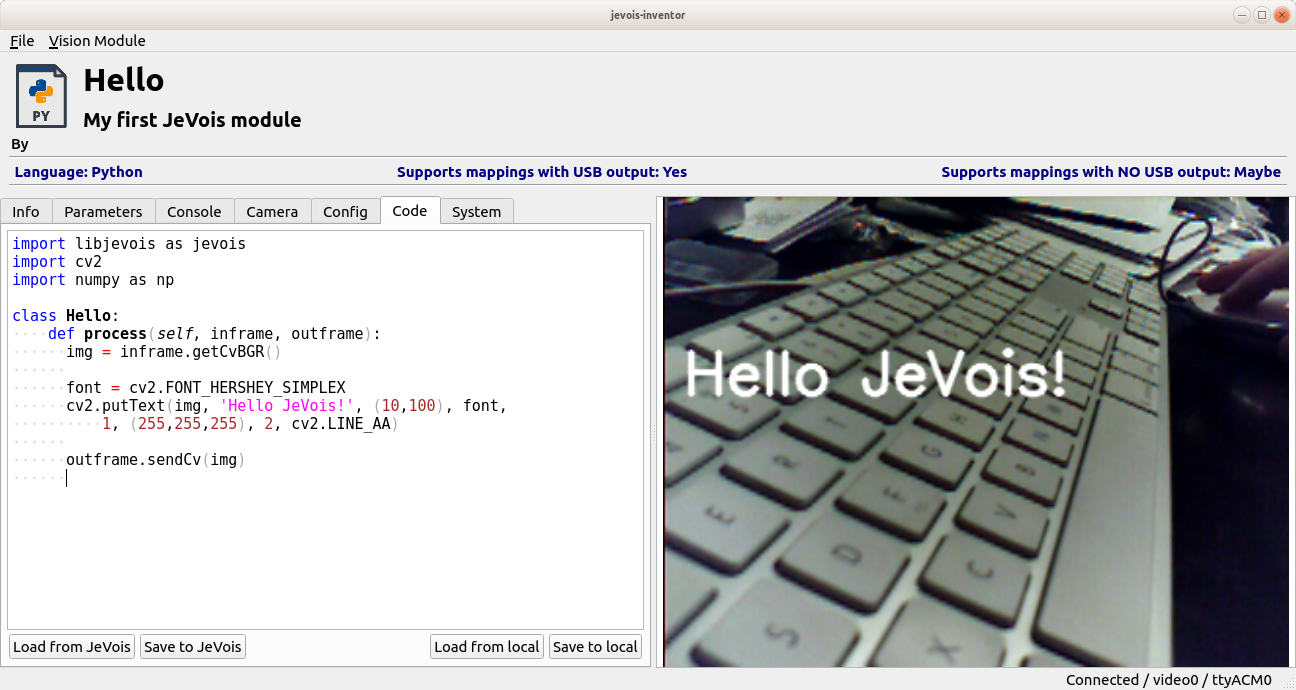
No worries, JeVois will catch your errors and display them in the video output. For example, delete the line

font = cv2.FONT_HERSHEY_SIMPLEX

and save to JeVois. You should see:

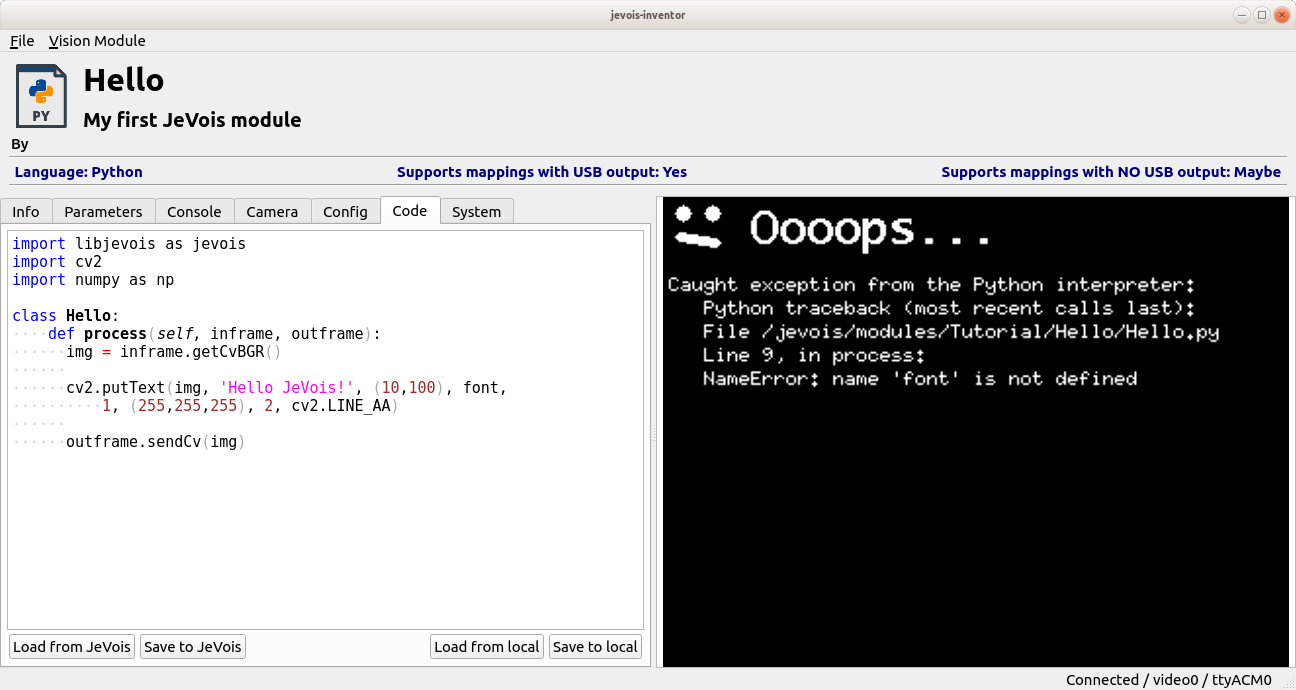
Now, please read the entire message fully before you ask us questions. Here, the error is clearly explained on the last line of the error message:

NameError: name 'font' is not defined

Paste the line you deleted back in its proper place, save to JeVois, and you should see the module working again.

Note
If the message is too long to read in the video image (e.g., if you are writing a module with very low output resolution), you can also see the same message as text by switching to the Console tab of the Inventor and clicking on the USB button for Log messages.

How do I make the ArUco tag detector you showed in the JeVois Inventor video?

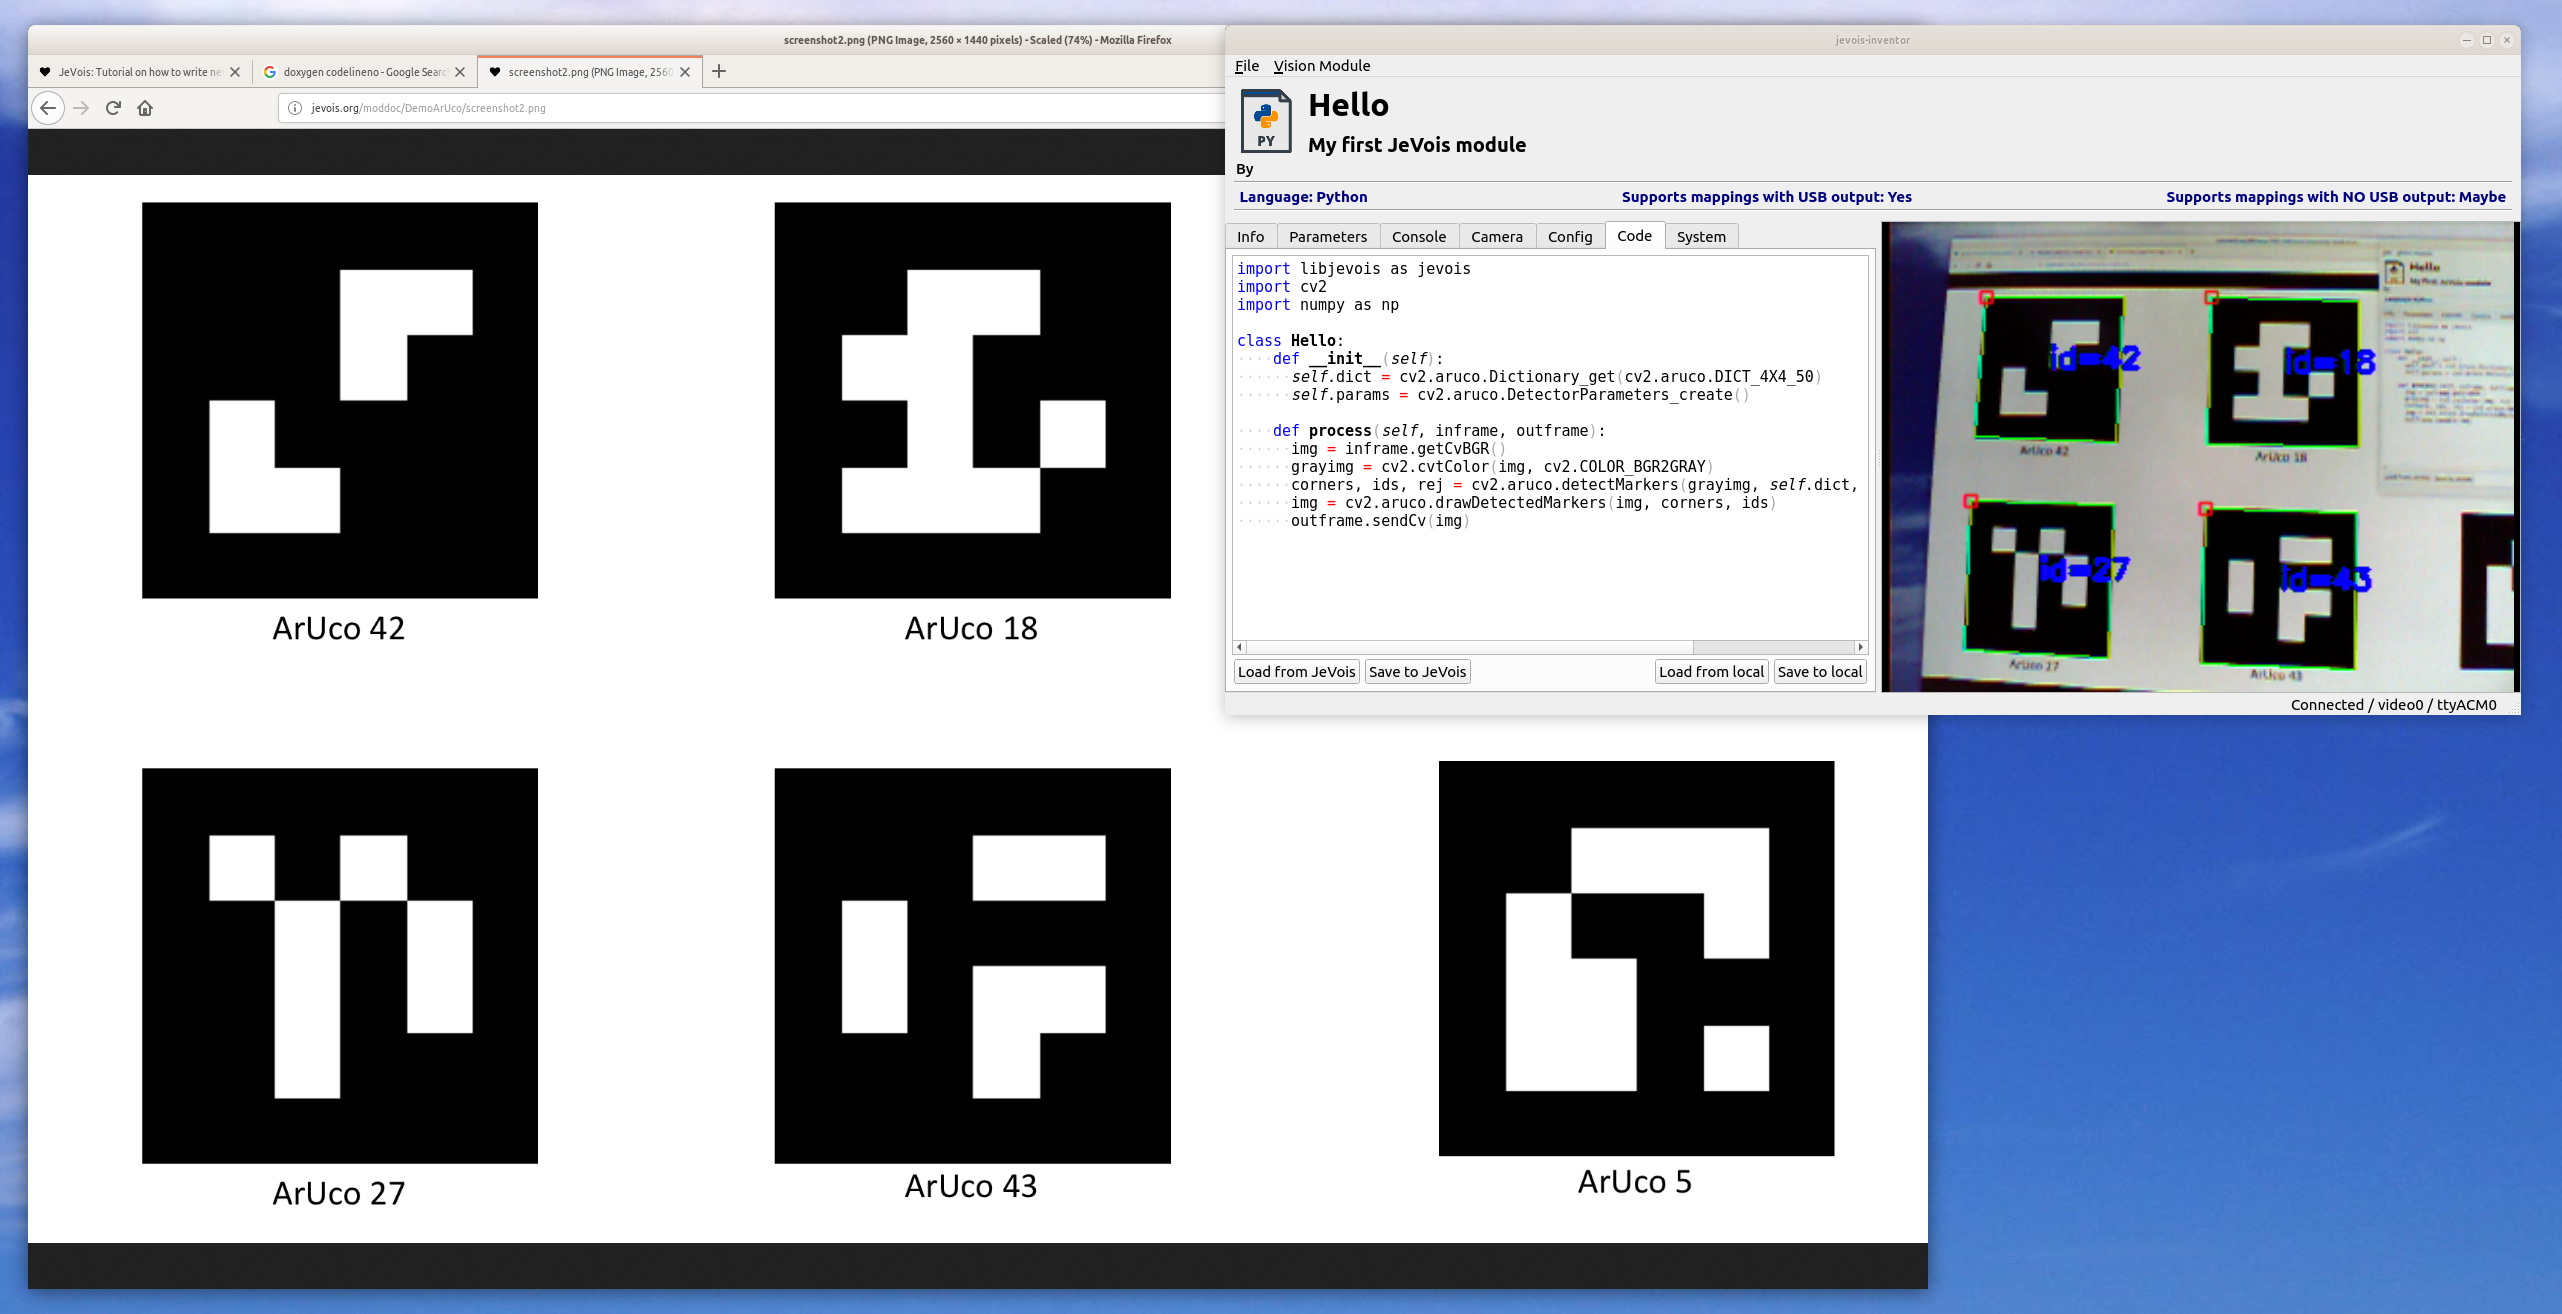
That is easy: ArUco tag detection is built into OpenCV. You just need 5 lines of new code to create that demo (they come from a quick web search for opencv aruco python):

import libjevois as jevois
import cv2
import numpy as np
class Hello:
def __init__(self):
self.dict = cv2.aruco.Dictionary_get(cv2.aruco.DICT_4X4_50)
self.params = cv2.aruco.DetectorParameters_create()
def process(self, inframe, outframe):
img = inframe.getCvBGR()
grayimg = cv2.cvtColor(img, cv2.COLOR_BGR2GRAY)
corners, ids, rej = cv2.aruco.detectMarkers(grayimg, self.dict, parameters = self.params)
img = cv2.aruco.drawDetectedMarkers(img, corners, ids)
outframe.sendCv(img)

Show it some ArUcos, for example those from the screenshots of the JeVois DemoArUco module.

For more info, see https://docs.opencv.org/3.1.0/d5/dae/tutorial_aruco_detection.html

Next steps

You are ready to write your own powerful machine vision modules for JeVois!

For further reading: