|
JeVois Tutorials
1.23
JeVois Smart Embedded Machine Vision Tutorials
|

|
|

Loading...
Searching...
No Matches
|
JeVois Tutorials
1.23
JeVois Smart Embedded Machine Vision Tutorials
|
|
|
This tutorial will show you how to train TensorFlow deep neural networks using your own collection of images and object categories, and how to run the trained network on the processor inside the JeVois smart camera. It closely follows the steps of the tutorial TensorFlow for poets developed by the TensorFlow team, adding a few steps to get the trained network working on JeVois.
Below are details on how to train and deploy your own deep network for JeVois.
The first few steps will follow closely the TensorFlow for poets tutorial. We recommend that you look at it as you also follow the steps outlined here, as it provides additional details not duplicated here.
Follow the instructions at https://www.tensorflow.org/install/
We are going to use the pip install method for TensorFlow 1.15. On Ubuntu 20.04, we did the following for an install with no GPU support (which is shown here as it is much easier than a full install with GPU support). We used the VirtualEnv installation method and python3 (see https://www.tensorflow.org/install for more details):
First, TensorFlow 1.15 requires python 3.7, but Ubuntu 20.04 ships with python 3.8. So we first need to install python 3.7 on our machine (see https://stackoverflow.com/questions/61430166/python-3-7-on-ubuntu-20-04):
Now we can proceed with the TensorFlow installation, just making sure we invoke python3.7:
Once activated, the shell prompt changes to show you the name of your VirtualEnv. We proceed as follows (from https://www.tensorflow.org/install/pip):
Verify the install:
We now follow the steps of the TensorFlow for poets tutorial at https://codelabs.developers.google.com/codelabs/tensorflow-for-poets/#1
We need to have a collection of images that we will use for training. The images should be organized under a number of directories, where each directory is the name of a given object category.
Let us just use the sample images from https://kiosk-dot-codelabs-site.appspot.com/codelabs/tensorflow-for-poets/#2 to set the ideas, but you can of course use your own images instead:
You should see:
and under each directory (daisy, dandelion, etc) we have a number of JPEG images which are pictures of that object:
| Category | Number of images |
|---|---|
| daisy | 633 |
| dandelion | 898 |
| roses | 641 |
| sunflowers | 699 |
| tulips | 799 |
If you want to add more categories, or use different categories, just follow the same organization principle:
Also see https://kiosk-dot-codelabs-site.appspot.com/codelabs/tensorflow-for-poets/#2
We proceed as outlined in https://kiosk-dot-codelabs-site.appspot.com/codelabs/tensorflow-for-poets/#3 and we will use a MobileNet with compression factor 0.5 and input size 128x128, as this should run at about 30 frames/s in the JeVois TensorFlowEasy module:
Then start training:
After 500 training steps, which here just took a few minutes, we get an accuracy of 86.5% in our particular run (your results will vary slightly).
We proceed as outlined in https://kiosk-dot-codelabs-site.appspot.com/codelabs/tensorflow-for-poets/#4 and then https://kiosk-dot-codelabs-site.appspot.com/codelabs/tensorflow-for-poets/#5
Let's test whether our trained model can now recognize our different types of flowers. We run the trained model on one image from our training set. This is expected to work very well since that image has been used for training:
You should get something like this (actual numbers will vary):
Evaluation time (1-image): 0.176s

daisy (score=0.99013)
dandelion (score=0.00729)
sunflowers (score=0.00258)
roses (score=0.00001)
tulips (score=0.00000)
Which means the network thinks that this image of a daisy indeed is a daisy with 99.01% confidence, or it could be a dandelion with 0.7% confidence, etc
We are done with the basic TensorFlow for poets tutorial. Let us now deploy the model to run on the JeVois smart camera. For that, we will convert it to the mobile-optimized TensorFlow Lite format.
We will follow some of the steps of now deprecated TensorFlow for Poets 2: TFLite. But this time we will skip some steps which are irrelevant to JeVois (installing an Android app, etc).
After our retraining above, two files were created:
We start by optimizing the model for inference, and then we just convert the model to TensorFlow Lite format (.tflite file). As of August, 2020 (and TensorFlow 1.15), we we should use the tflite_convert utility, as follows:
We are now ready to deploy the final model to our JeVois camera. Insert your JeVois microSD into your host computer and check that it is detected. Then copy the model and labels files to it:
Optional: if you want your new model to be loaded by default when TensorFlowEasy is loaded: edit /media/${USER}/JEVOIS/modules/JeVois/TensorFlowEasy/params.cfg and add:
netdir=flowers
foa=128 128
and comment out any other settings in that file so that the one you just added for flowers is the only uncommented one in the whole file.
Insert the microSD into JeVois and connect it to your host computer, then use JeVois Inventor, or launch TensorFlowEasy by selecting YUYV 320x308 resolution in guvcview or any other video capture software:
If you did not edit params.cfg above, you need to manually select your new network by connecting to the JeVois command line interface and issuing:
setpar netdir flowers
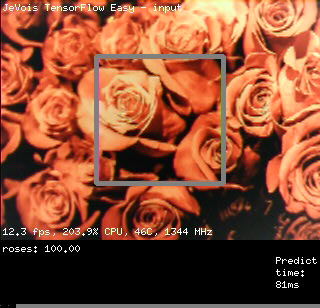
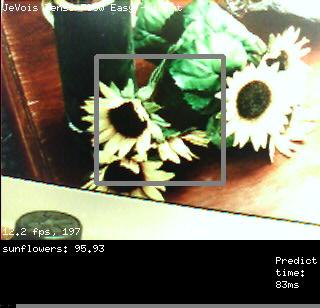
Point your JeVois camera to the different kinds of flowers we have trained it for (or to pictures of those from tf_files/flower_photos/) and see how well it can recognize them!
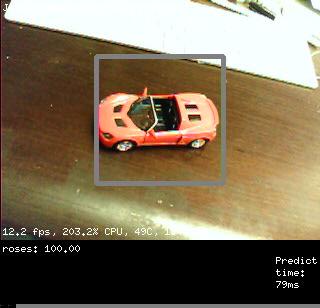
Note that we did not train a negative or background category in this tutorial. So the model is likely to detect flowers when looking at other things, just because the only things it now knows about the world are those 5 types of flowers we have trained it on.
tflite_convert utility should be able to produce a quantized network for JeVois, but we have not yet fully figured out how (some issues with normalization and ranges of values). A good start may be here: https://github.com/tensorflow/tensorflow/blob/master/tensorflow/lite/g3doc/r1/convert/cmdline_examples.md in the section about quantization.  1.9.8
1.9.8