When you run jevois-daemon on host (see The jevois-daemon executable), error messages will be printed in the terminal window from which you started it.
You can also run jevois-daemon in gdb (the GNU debugger) and see where it might crash.
Sometimes that does not run well as we use lots of threads in JeVois. You can instead debug offline by enabling core dumps, running jevois-daemon until it crashes, and then using gdb to inspect the core file. See The jevois-daemon executable for details.
Debugging compiler and linker errors
Compilation errors are reported in quite a verbose way. But linker errors are harder to debug. If you end up with an error message about a missing library, it is useful to see which linker command was exactly called with all paths specified in there to check why your library is missing.
CMake allows you to switch to verbose mode by specifying VERBOSE=1 as an option to make. So, if you get a missing library error, then
cd hbuild/ # or pbuild/, phbuild/, etc
make VERBOSE=1
This will show you the linker command that was run. You can then look at all the -L... arguments and check your CMakeList.txt to understand why your library was not found.
Enabling debug-level messages
You can turn on CMake flags JEVOIS_LDEBUG_ENABLE and JEVOIS_TRACE_ENABLE when compiling jevois to enable extra-verbose debugging messages (see Compiling JeVois core software from source). Note that these flags only enable those messages to be compiled in. To see them, you also need to set the parameter loglevel to debug at runtime (see Command-line interface user guide).
If you change those flags, you must recompile everything from scratch (recompile jevois, jevoisbase, your modules, etc).
JeVois-Pro: Debugging on the platform hardware
Perhaps the easiest debugging workflow for JeVois-Pro is:
enable core dumps and run jevoispro.sh, then use gdb to find the error, as described in The jevois-daemon executable
JeVois-A33: Debugging the boot process on platform hardware
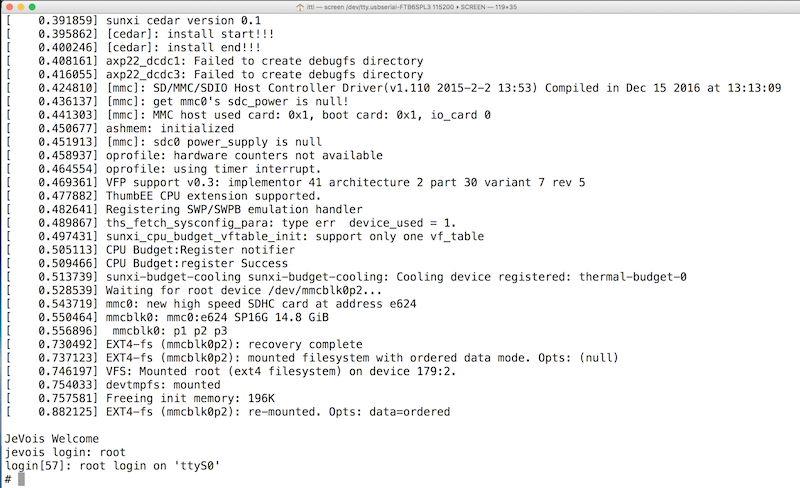
If you are tinkering with low-level software on your JeVois smart camera hardware and are experiencing difficulties with booting up, you can enable boot messages. This requires that you connect to the JeVois 4-pin hardware serial port during boot, as the boot messages will be sent to that serial port. This is very useful to troubleshoot any boot issues, or even to drop to a login prompt instead of starting up jevois-daemon automatically when the smart camera starts.
This requires that you connect the 4-pin serial port of your JeVois camera to a terminal. You can use:
a USB-to-serial cable or dongle (also known as FTDI cable, or USBISP dongle, etc). Then connect it as shown in the Serial port user guide, and communicate to it using screen, HyperTerminal, etc (see Command-line interface user guide but replace ttyACM0 in there by ttyUSB0 or whichever device is created and reported by the dmesg command when you plug your USB-to-serial adapter into your host computer).
an Arduino or other micro-controller
anything else that provides a TTL-level serial terminal
Then, you can:
edit BOOT:uEnv.txt on your microSD to enable verbose boot messages to the serial port
create an empty file BOOT:login, which will be detected by the JeVois camera when it boots up. If that file is present, jevois-daemon will not automatically start, and instead you will get a login prompt on the serial console. Username is root with no password. After you login, you can start JeVois software maunally as it would have started automatically, by running /usr/bin/jevois.sh.
create an empty file BOOT:nousbserial if you wish to not start the serial-over-USB feature for some reason.
JeVois v1.1 create an empty file BOOT:serialtty if you wish to get a login prompt on the 4-pin hardware serial port instead of the JeVois console.
JeVois v1.1 create an empty file BOOT:usbserialtty if you wish to get a login prompt on the serial-over-USB port instead of the JeVois console. Has no effect if BOOT:nousbserial is also present.
JeVois v1.1 create an empty file BOOT:nousbsd if you wish to not enable the microSD-over-USB feature for some reason.
JeVois v1.1 create an empty file BOOT:usbsdauto if you wish to automatically export the microSD JEVOIS partition over USB upon startup. Note that this will force the JEVOIS partition to be read-only on the device side (and it will be read-write from the host computer), i.e., the JeVois processor will not be able to 1) compile python modules, 2) write out any video files or other data to microSD.
JeVois v1.7.2 create an empty file BOOT:multicam to lower the USB bandwidth requested by JeVois. This will allow you to connect up to 3 JeVois cameras to a single USB port (through a hub). By default, JeVois requests all of the available USB isochronous bandwidth, so as to minimize the latency between image capture and image reception at the host. See JeVois-A33 streaming video from multiple JeVois cameras connected to one USB bus for more details.
JeVois v1.8.0 create an empty file BOOT:quietcmd to suppress sending 'OK' back to the user after every successful command received at the command line. Recommended for advanced users only.
JeVois v1.8.0 create an empty file BOOT:nopython to disable support for modules written in python. When activated, attempting to load a python module will throw an exception. Disabling python saves a lot of memory and may be useful when using C++ modules that run large deep neural networks.
edit the file ~/jevois/bin/jevois.sh, which gets installed to microSD as LINUX:/usr/bin/jevois.sh, for example to start jevois-daemon in gdb (see The jevois-daemon executable).
Verbose boot messages and login prompt over the 4-pin serial port
Also check out this video (somewhat old, things may look a bit different now):
 1.9.8
1.9.8
