|
JeVois Tutorials
1.23
JeVois Smart Embedded Machine Vision Tutorials
|

|
|

Loading...
Searching...
No Matches
|
JeVois Tutorials
1.23
JeVois Smart Embedded Machine Vision Tutorials
|
|
|
In this tutorial, we write a very simple module to just save images captured by the JeVois camera sensor to the microSD card inside JeVois. This can be useful, for example, to collect training data when developing a new machine vision algorithm. As you will see, this can be achieved in just a few minutes.
For this tutorial, you do not need to install any software (except for a video capture program, if you do not already have one): We will directly edit the Python code on the microSD card that is inside JeVois.
Here, we will focus on step-by-step instructions for how to make all of this work.
Exporting the microSD inside JeVois as a virtual USB flash drive poses potential data consistency issues between the host and JeVois camera, hence JeVois currently requires that no machine vision module be loaded and no video be streaming during access to its microSD over USB.
Thus, just close any video capture program before you attempt to export the microSD of JeVois over USB.
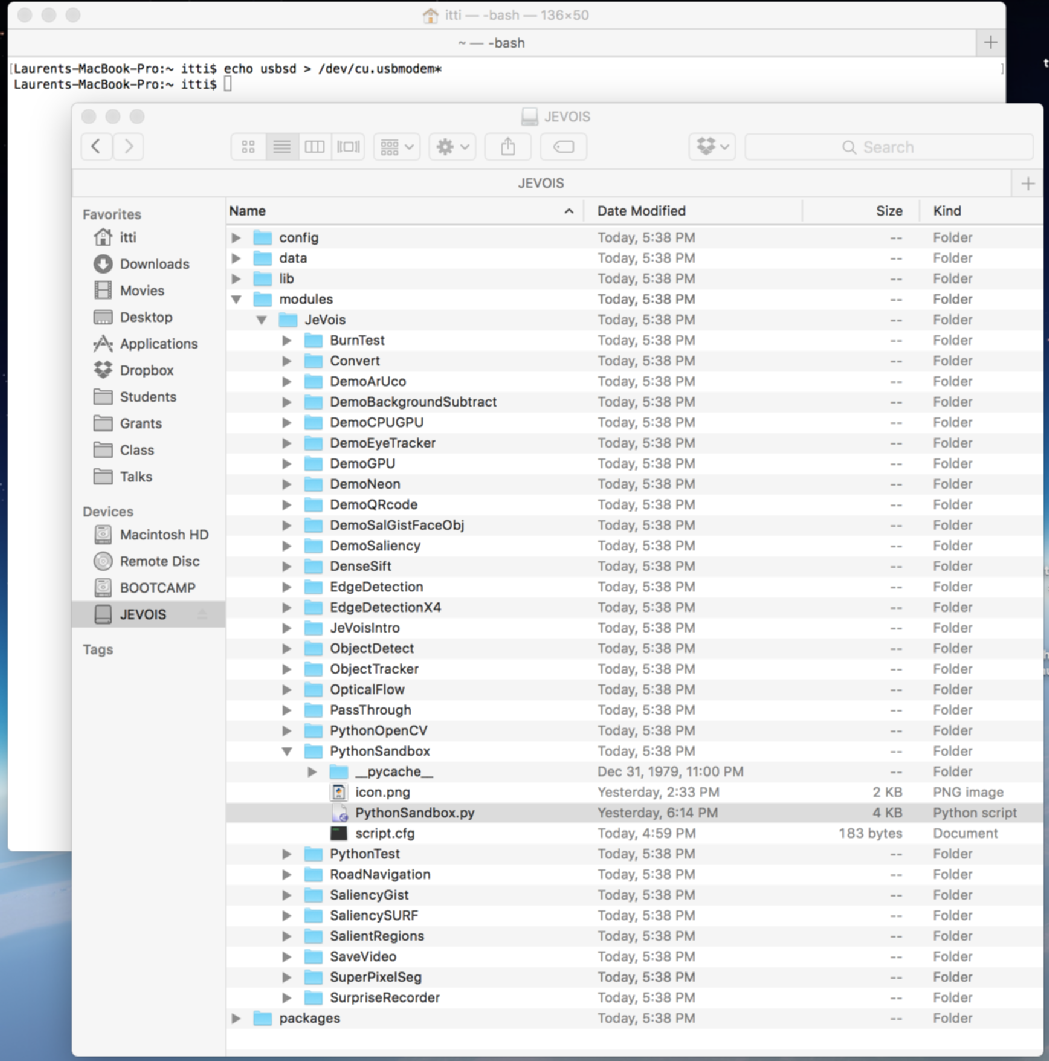
To export the microSD inside JeVois, send the command usbsd to JeVois over a serial link. You can do that by first connecting to JeVois using a serial terminal and then typing this command. For example, use the Arduino IDE to connect, as done in Using the Arduino IDE (Integrated Development Environment) to talk to JeVois.
Here, since we only want to give that one command to JeVois, we can also instead do:
jevois-usbsd start (to export it),jevois-usbsd stop (to eject and reboot JeVois).echo usbsd > /dev/cu.usbmodem*Here is what the microSD inside JeVois looks like when exported to a Mac host computer:
The conventions for creating a new module are as follows:
create a directory JEVOIS:/modules/Vendor/ModuleName where
Here, let us create a new directory JEVOIS:/modules/Test/SaveImages/
processNoUSB() in it which will receive the next image from the camera sensor and will write it to disk, while outputing no video stream over USB (so the camera can work in standalone mode with no host computer).That is, we get the frame from the camera as an OpenCV image with BGR pixels, then use the OpenCV function imwrite() to save it to disk as a PNG file. We use self.frame as a counter to give each new image a new name.
To stop exporting the microSD inside JeVois, just do a proper eject of that drive:
When you eject the drive, JeVois will restart. You will see its LED blink.
Once JeVois is back online, connect to it, for example using the Arduino IDE, as done in Using the Arduino IDE (Integrated Development Environment) to talk to JeVois.
To load the module, we will use the setmapping2 JeVois command (see Command-line interface user guide):
setmapping2 YUYV 320 240 30.0 Test SaveImages
You can choose any resolution pixel format (here, YUYV), resolution (here, 320x240 pixels), and framerate (here, 30.0), that are supported by the JeVois camera sensor (see Advanced topic: Image pixel formats and Advanced topic: Video mappings and configuring machine vision modes for more info), namely:
Finally, to start saving frames, we need to issue a:
streamon
which instructs the camera sensor to start streaming video, after which the captured video frames will be sent to our module's processNoUSB() function.
processNoUSB() function is still running on a previous frame will just safely be dropped. You may want to also check out the SaveVideo module which can save video using a more complex multi-threaded buffering setup.When done with saving images, issue a
streamoff
and, to export the microSD as flash drive again, issue a
usbsd
Now browse JEVOIS:/data/ for files named saveimagesXXX.png and enjoy! You can copy these files to your host computer, view them, delete them, etc as you would do with a regular USB flash drive.

It is possible to configure JeVois to automatically start capturing and saving images as soon as it is powered on. To achieve this, edit the file JEVOIS:/config/initscript.cfg and basically add the commands, which we have entered manually above, into that file:
setmapping2 YUYV 320 240 30.0 Test SaveImages
streamon
initscript.cfg is automatically executed when the camera starts up. You can just power JeVois from a USB battery pack and have it save pictures when it is powered on.
 1.9.8
1.9.8