Converting and running neural networks for Hailo-8 SPU
JeVois-Pro supports the 26-TOPS Hailo-8 Stream Processing Unit (SPU) as an optional add-on neural accelerator on an M.2 2230 A+E board using the PCIe interface. To date, this is the fastest accelerator available in this form factor.
Note
JeVois-Pro only. This accelerator is not supported on JeVois-A33.
You need to download and install the Hailo Software Suite docker to convert/compress your model on a desktop computer running Linux Ubuntu 20.04 or later. Registration and password required. Hailo reserves the right to accept or deny your developer registration request.
Everything you need for runtime inference (HailoRT runtime libraries, Hailo PCIe kernel driver) is pre-installed on your JeVois microSD.
Obtain a model: train your own, or download a pretrained model.
Obtain some parameters about the model (e.g., pre-processing mean, stdev, scale, expected input image size, RGB or BGR, packed (NWHC) or planar (NCHW) pixels, etc).
Either convert the model using the Hailo command-line tools, or using the Hailo model zoo:
Approach one: command line tools:
Use hailo parser to convert the source model to a Hailo archive (.har)
Use hailo optimize to optimize the model for Hailo-8 and quantize to int8.
Use hailo compiler to convert the model to a binary blob (.hef) that can run on JeVois-Pro
Additional commands are available to visualize your model, check its performance on a validation set, etc.
Try hailo tutorial for a jupyter tutorial from Hailo.
Approach 2: if your model, or a highly similar one (e.g., yolo11 vs. yolo8), is already in the Hailo Model Zoo, you can get a possibly better-optimized conversion by using the hailomz compile command instead.
We provide examples of both approaches below.
Copy converted model to JeVois microSD card under JEVOISPRO:/share/dnn/custom/
Create a JeVois model zoo entry for your model, where you specify the model parameters and the location where you copied your model files. Typically this is a YAML file under JEVOISPRO:/share/dnn/custom/
Launch the JeVois DNN module. It will scan the custom directory for any valid YAML file, and make your model available as one available value for the pipe parameter of the DNN module's Pipeline component. Select that pipe to run your model.
Setting up the Hailo Software Suite
Note
Everything below is to be run on a fast x86_64 desktop computer running Ubuntu 20.04 Linux or later, not on your JeVois-Pro camera. At the end, we will copy the converted model to microSD and then run inference on JeVois-Pro with that model.
We use HailoRT-4.19.0 below but later versions should work as well. For best compatibility, please download the same version as is installed on your camera (type !dpkg --list | grep hailo in the console of the camera).
Download the HailoRT – Ubuntu package (deb) for amd64
Download the HailoRT – PCIe driver Ubuntu package (deb)
Install the PCIe drivers and runtime library. This is not strictly necessary but it will eliminate many warnings as we proceed (say Y to DKMS, it will carry the driver through kernel updates; do not worry if it fails, maybe you need to install dkms, kernel-headers, etc):
sudo usermod -aG docker ${USER} # give your user docker access; need to reboot to take effect
Install the nvidia-container-toolkit if you have an nvidia GPU, so that you can use the GPU in docker to optimize your model much faster, following the latest instructions. At the time of this writing, these were:
At this point, you can get a model from the Hailo Model Zoo and retrain it, get your own model and convert it, etc. following the Hailo docs. We show an example below.
When you are done, just exit the docker container.
To resume later, type ./hailo_ai_sw_suite_docker_run.sh --resume.
To restart fresh and replace the old container by a new one, type ./hailo_ai_sw_suite_docker_run.sh --override
To copy files between your host and the Hailo docker, try this on your host (not in the container):
from inside the container, /local/shared_with_docker/ is shared with shared_with_docker/ in the host directory that also has hailo_ai_sw_suite_docker_run.sh so this is the easiest way to transfer files to/from the container. Otherwise:
sudo docker container ls -a shows the ID of the container, e.g., 4f6342fbc915
sudo docker cp myfile 4f6342fbc915:/local/workspace/ copies from host to container
sudo docker cp 4f6342fbc915:/local/workspace/myfile . copies from container to host
Installing the requirements uninstalls the hailo-provided torch, then installs apparently the same version. This may interfere with other aspects of the Hailo software suite. So you may want to do that in a different virtualenv or on your native host and then copy the result to the container as shown above.
We now have yolov7.onnx
To visualize it using Netron, run google-chrome https://netron.app (still within the container), select "Open
Model...", and then select the model, which is in /local/workspace/yolov7.onnx in the container. In particular, we see 3 outputs, 1x3x80x80x85, 1x3x40x40x85, 1x3x20x20x85 for the usual 3 YOLO scales (shapes are unusual, we will fix that later). Note that the original model includes some additional post-processing, but that was stripped from the export, which is great because it may not be supported by the hardware accelerator. The JeVois software will provide post-processing. Input is 1x3x640x640 (NCHW).
1.3. Run the Hailo parser
The Hailo Model Zoo User Guide in the Hailo download section has good detailed instructions.
First, parse the model from ONNX into a Hailo archive (HAR):
hailo parser onnx yolov7.onnx
We get some errors about unsupported layers 298, 299, 301, 302, 304, 305 and a recommendation to try again, "using
these end node names: Conv_297, Conv_300, Conv_303". Those are outputs before final reshaping, e.g., conv_303 (last Conv block towards bottom of the graph in Netron) is 1x255x20x20 then gets reshaped to 1x3x20x20x85. Indeed, we should use Conv_303 as this is the kind of YOLO output shape that jevois::dnn::PostProcessorDetect can handle. So we try again (after running hailo parser onnx yolov7.onnx –help to get some help):
If you get an error onnx.onnx_cpp2py_export.checker.ValidationError: Your model ir_version 10 is higher than the checker's (9). that means that you need to use an older version of ONNX during the export in step 1. We recommend installing pip install ultralytics in the hailo container to avoid this problem, then copy the model's .pt file to the container and run the export to ONNX in the hailo container.
Success, we now have yolov7.har
1.4. Get a sample dataset
We need a sample dataset for quantization of the model. It will be processed through the model (forward inference only) to determine the range of values encountered on every layer. These ranges will then be used for quantization.
If you trained your model on a custom dataset, copy about 100 images from your validation set into a new directory here.
That's 5,000 images which is more than we need. The unix command shuf can randomly shuffle a list of names and take the first n, so let's use it to grab 100 random images from the dataset and copy them to a new directory sampledata:
mkdir sampledata
cp `ls ./val2017/*.jpg | shuf -n 100` sampledata/
sampledata/ should now contain 100 jpeg images.
Hailo wants the sample dataset as a ".npy file containing numpy array of preprocessed images with shape
(calib_size, h, w, c)" (from running hailo optimize –help). So we need to write a little python script numpy_sampledata.py to do that:
We get yolov7.hef which we will copy to the microSD of JeVois-Pro.
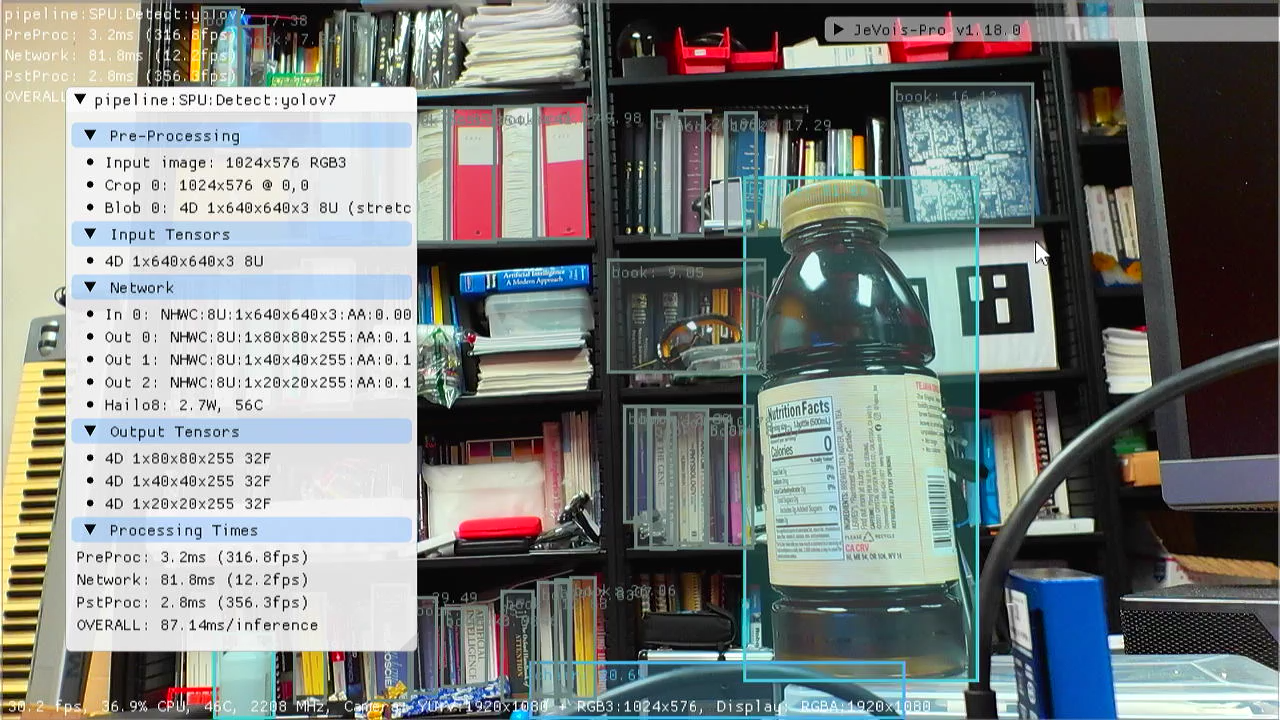
The compiler predicts 12.27 FPS for this model, which sounds pretty good given its size. Note that it aimed for a compute utilization of 75% and does indeed achieve that. Maybe that can be increased through some parameter. For faster FPS, yolov7-tiny is available, or one could reduce the input size.
1.7. Create JeVois-Pro YAML zoo file
We start with any of the YOLO entries in zoo file spu.yml already in the JeVois microSD (and available in the Config tab of the GUI).
In the YAML file below, we will separate the 3 sets of anchors for the 3 YOLO scales by semicolons.
Because YOLOv7 uses the "new style" of YOLO coordinates, we need to disable Post-Processor sigmoid and set Post-Processor scalexy to 2.0. You would want that for YOLOv5/v7. Conversely, set sigmoid to true and scalexy to 0.0 (defaults) to use old-style box coordinates for YOLOv2/v3/v4. You can look at the differences in jevois::dnn::PostProcessorDetectYOLO::yolo_one()
Here, actually, it looks like these 3 Conv layers we used for our outputs have linear activation in that particular model (check them out in Netron). So we need to set sigmoid to true as the post-processor will require that for YOLO decoding.
We just modify the name and file locations, bring all the global definitions that were in spu.yml into our file (like preproc, nettype, etc which were set globally in spu.yml and hence not repeated for the entry we are copying from), and end up with the following yolov7.yml:
It works! Indeed about 12.2 FPS for the network inference, as promised by the compiler. This is a large model and also using 640x640 inputs. If you need higher frame rate, try smaller inputs or yolov7-tiny. Or try YOLOv5m-640 provided by the Hailo team, it runs at over 45 FPS on JeVois-Pro.
Another example for Approach 1: YOLOv9s discrete head pose by PINTO0309
If you get an error onnx.onnx_cpp2py_export.checker.ValidationError: Your model ir_version 10 is higher than the checker's (9). that means that you need to use an older version of ONNX during the export in step 1. We recommend installing pip install ultralytics in the hailo container to avoid this problem, then copy the model's .pt file to the container and run the export to ONNX in the hailo container.
We get yolov9_s_discrete_headpose_0100_1x3x576x1024.hef which is ready for JeVois-Pro.
Create a JeVois zoo YAML file yolov9_s_discrete_headpose_0100_1x3x576x1024-custom.yml for this model as for the other above:
Approach 2: Model conversion using the Hailo Model Zoo converter
For models which Hailo has already converted, we can use the Hailo Model Zoo for conversion, using instead our custom retrained model, or custom input sizes, etc. This will ensure best compatibility with existing JeVois post-processors.
A copy of the Hailo Model Zoo is already in the Hailo docker.
The steps will be:
Find config files for the same network as we want to convert, and modify them as needed.
Download any needed dataset for quantization using scripts provided in the Hailo Model Zoo.
Use hailomz to parse, optimize, and compile the model.
This will basically execute the same steps as outlined above, but using config files that have been optimized by the Hailo team for a specific model architecture, as opposed to us having to figure out which outputs we want in Netron, and other configuration/optimization parameters. For example, a set of outputs is defined in the config files, possible additional sigmoid activations applied to them, etc.
Here we convert yolo11m pre-trained to use input resolution 1024x576 (width x height) which has the correct aspect ratio for the JeVois-Pro camera sensor. At the time of this writing, yolo11 just came out, so it was not yet in the Hailo Model Zoo. By the time you read this, it may already be included in a later version of the Hailo model zoo.
Note
Starting with Yolo version 11, Ultralytics is now using name yolo11 as opposed to yolov11...
2.1. Download and export the model to ONNX
The Hailo toolchain may use slightly old software, while packages like Ultralytics will use the latest. This can create compatibility issues, For example, max supported ONNX ir_version (internal representation version) is 8 with the Hailo toolchain at the time of this writing, while just exporting a YOLO model from Ultralytics will use version 9.
Beyond the ir_version which relates to the internal structure of the ONNX file, ONNX also has various opset variants, which are the set of operators that are supported. Harware accelerators will not support the latest ONNX operators, since their silicon was designed a few years ago, but will support the basic convolution, sigmoid, etc operators that we need for the bulk of the network. So you may also want to export with an older opset, e.g., opset 12.
# To avoid compatibility issues with different versions of ONNX, you may want to run this inside the hailo container
# (or, you could try to run it on a machine that has an older ONNX installed; for example, `pip install onnx==1.12.0`):
pip install ultralytics
# If you have retrained your model, use your .pt file instead of yolo11m.pt below.
# Export to ONNX; see https://docs.ultralytics.com/integrations/onnx/ and https://docs.ultralytics.com/modes/export/
Load it in Netron and check the ONNX version (click on the input node) and that the structure is correct.
2.2. Create a modified config file
Everything we run below is from inside the docker container we started above.
Yolo11 is very similar to YoloV8, so the Hailo config files for YoloV8 will almost work as-is. Critical for other models will be to inspect them in Netron and decide which output nodes you want to use.
For this network, we also want to disable Hailo post-processing which is much slower than the JeVois version.
cd hailo_model_zoo/hailo_model_zoo/cfg/networks/
cp yolov8m.yaml yolo11m.yaml
# Chnage location of source onnx file:
sed -i 's/models_files/yolo11m.onnx #/' yolo11m.yaml
sed -i 's/url:/#url:/' yolo11m.yaml
# Change the input size: we replace 640x640x3 by 576x1024x3 in the config file (may not be needed?):
sed -i 's/640x640x3/576x1024x3/' yolo11m.yaml
# Change network name:
sed -i 's/network_name: yolov8m/network_name: yolo11m/' yolo11m.yaml
# Disable Hailo post-processing, we will use faster JeVois code:
sed -i 's/nms_postprocess/#nms_postprocess/' ../alls/generic/yolov8m.alls
# Fix output shapes (may not be needed?; the value 80 below is number of classes):
# Inspect the corresponding ../alls/generic/yolov8m.alls and it looks like we will not change anything.
# Also inspect the other config files that are included by yolo11m.yaml and its includes.
Note
Different YOLO network sizes (n,t,s,m,l,x) use different output node names. Always inspect in Netron. For a list of output nodes to use with various YOLO variants above v8, see our tutorial: http://jevois.org/tutorials/UserYolo.html
2.3. Convert the model for Hailo using hailomz
The next step is to run 'hailomz compile yolo11m'; however, we encountered a few hurdles, which we will address now:
The downloaded dataset was not in the directory expected by the model zoo's config files, fix that:
cd /local/shared_with_docker/.hailomz/models_files/coco/
ln -s 2023-08-03 2021-06-18
cd /local/workspace
We are now ready to convert (could take several hours):
hailomz compile yolo11m
We get yolo11m.hef which is ready to run on JeVois-Pro. We will rename it when copying to microSD below.
2.4. Create JeVois-Pro YAML zoo file
We need to specify what kind of pre-processing to use, network type, and post-processing type. You can look at similar entries in spu.yaml for guidance. We end up with the following yolo11m-custom.yml:
%YAML 1.0
---
yolo11m-custom:
preproc: Blob
mean: "0 0 0"
scale: 1.0
nettype: SPU
model: "dnn/custom/yolov11m-custom.hef"
postproc: Detect
detecttype: YOLOv8
# Class label file, here COCO (create your own custom list of object labels for a custom model):
classes: "dnn/labels/coco-labels.txt"
# Because Hailo .alls file added a sigmoid to class probabilities outputs, turn off sigmoid in JeVois postproc:
sigmoid: false
We copy yolo11m-custom.yml and yolo11m-custom.hef to /jevoispro/share/dnn/custom/ on JeVois-Pro and let's try it:
Set the pipe parameter to SPU:Detect:yolo11m-custom
Tips
You may want to start with the models in the Hailo Model Zoo. Those should convert well, and also you can get an idea of their speed beforehand by looking at the GFLOPS figures. Note, however, that some detection models have been converted with quite unusual sets of outputs, which the JeVois PostProcessor may not support. All the model architectures in JeVois-Pro Deep Neural Network Benchmarks should work using the same sets of output tensors.
 1.9.8
1.9.8
