JeVois-Pro supports Google Coral 4-TOPS tensor processing units (TPU) as optional hadrware neural accelerator. One can use either the standard Coral M.2 2230 A+E PCIe board, a custom JeVois board that includes 2 Coral TPUs + one eMMC flash disk onto a single M.2 2230 board, or any number of Coral USB dongles. Note that PCIe is much faster at 5 Gbits/s data transfer compared to USB 2.0 at 480 Mbits/s (the JeVois-Pro processor only have one 5 GBits/s interface, which we use for PCIe).
- Note
- JeVois-Pro only. This accelerator is not supported on JeVois-A33.
Supported neural network frameworks
- TensorFlow / TensorFlow-Lite
The TPU can run models quantized to int8 weights. It does not support float weights and hence quantization and conversion are necessary. A limited number of operations and layer types is supported by the hardware, which further constrains what can run on it. Further, only a small amount of RAM is on the accelerator, which further constrains the size of networks that can efficiently run on it. But it is manyfold faster than a standard CPU.
For execution on TPU, your model will be quantized and then converted on a Linux desktop to a blob format that can then be transferred to JeVois-Pro microSD for execution.
Procedure
- Read and understand the JeVois docs about Running neural networks on JeVois-A33 and JeVois-Pro
- Make sure you understand the quantization concepts in Converting and Quantizing Deep Neural Networks for JeVois-Pro
- Check out the official Google Coral docs
- The TPU only supports a specific set of layer types. If you try to convert a network that contains unsupported layers, the conversion may sometimes seem to succeed but your converted network may fail to run, or run very slowly using CPU-based emulation. Check the compatibility overview before you attempt to convert a network. In particular, note this statement in the Coral docs: Note: Currently, the Edge TPU compiler cannot partition the model more than once, so as soon as an unsupported operation occurs, that operation and everything after it executes on the CPU, even if supported operations occur later.
- You need to download and install the EdgeTPU compiler to convert/quantize your model on a desktop computer running Linux Ubuntu 20.04.
- Everything you need for runtime inference (EdgeTPU runtime libraries, kernel drivers, PyCoral) is pre-installed on your JeVois microSD.
- Obtain a model: train your own, or download a pretrained model.
- Beware the the TPU has only around 6.5 MBytes of available on-board RAM for model parameters, which acts as a pseudo cache (see https://coral.ai/docs/edgetpu/compiler/). So, best performance will be obtained with smaller models which can fit into that small RAM all at once. Larger models will require constant loading/unloading of weights over the PCIe or USB links. Larger models run much better on the JeVois-Pro integrated NPU, which has direct access to the main RAM (4 GBytes on JeVois-Pro).
- Google recommends starting from one of their models at https://coral.ai/models/ and retraining it on your own data as explained in https://github.com/google-coral/tutorials
- Obtain some parameters about the model (e.g., pre-processing mean, stdev, scale, expected input image size, RGB or BGR, packed (NWHC) or planar (NCHW) pixels, etc).
- Copy model to JeVois microSD card under JEVOIS[PRO]:/share/dnn/custom/
- Create a JeVois model zoo entry for your model, where you specify the model parameters and the location where you copied your model files. Typically this is a YAML file under JEVOIS[PRO]:/share/dnn/custom/
- Launch the JeVois DNN module. It will scan the custom directory for any valid YAML file, and make your model available as one available value for the
pipe parameter of the DNN module's Pipeline component. Select that pipe to run your model.
Setting up the EdgeTPU compiler
- Note
- Everything below is to be run on a fast x86_64 desktop computer running Ubuntu 20.04 Linux, not on your JeVois-Pro camera. At the end, we will copy the converted model to microSD and then run inference on JeVois-Pro with that model.
Follow the instructions at https://coral.ai/docs/edgetpu/compiler/
curl https://packages.cloud.google.com/apt/doc/apt-key.gpg | sudo apt-key add -
echo "deb https://packages.cloud.google.com/apt coral-edgetpu-stable main" | sudo tee /etc/apt/sources.list.d/coral-edgetpu.list
sudo apt-get update
sudo apt-get install edgetpu-compiler
edgetpu_compiler --help
Example: Object classification using NASNetMobile
1. Install TensorFlow
- The preferred method is through conda, as detailed at https://www.tensorflow.org/install/pip
- Here we will instead just get the tensorflow wheel in a python3 virtual env, which has fewer steps:
python3 -m venv tf_for_tpu
source tf_for_tpu/bin/activate
pip install --upgrade pip
pip install tensorflow
python3 -c "import tensorflow as tf; print(tf.reduce_sum(tf.random.normal([1000, 1000])))"
You may see some warnings about missing GPU libs which we just ignore here (CPU is enough to just convert a model), and finally something like tf.Tensor(-337.86047, shape=(), dtype=float32) which is the result of our test command (the value -337.86047 will vary since it is randomized).
2. Get the trained model
- We find a Keras/Tensorflow NASNetMobile pre-trained on ImageNet at https://keras.io/api/applications/
- We will get it loaded into TensorFlow as explained in https://keras.io/api/applications/nasnet/#nasnetmobile-function
- So we start a little convert.py script as follows:
import tensorflow as tf
import numpy as np
model = tf.keras.applications.NASNetMobile()
- This will use all the defaults: 224x224x3 inputs, ImageNet weights, include last fully-connected layer, include final softmax activation.
- You could retrain the model at this stage. Here we will just use it as is.
- If we run our convert.py now, it just downloads the model and exits.
2. Get a sample dataset for quantization
- Since we are using ImageNet, we could get that dataset from some built-in TensorFlow function, but let's do it manually to see how it would be done on a custom dataset.
- We still want the data to be representative of our training data, so let's download the ImageNet validation set:
- We go to https://image-net.org but download is by request only even after creating an account
- So instead we get a torrent file from http://academictorrents.com/details/5d6d0df7ed81efd49ca99ea4737e0ae5e3a5f2e5 and use
transmission-gtk (pre-installed on Ubuntu) to download the dataset.
- We obtain ILSVRC2012_img_val.tar which we untar:
mkdir dataset
cd dataset
tar xvf ~/Downloads/ILSVRC2012_img_val.tar
cd ..
- We need to understand how pre-processing works and what mean, stdev, and scale should be applied to the raw pixel values so that we can later set the correct pre-processing parameters. We find some info in the TensorFlow docs for NASNetMobile which suggest that nasnet.preprocess_input() will scale to [-1 .. 1]. But no mention of means... Further looking at the source code, nasnet.preprocess_input() calls imagenet_utils.preprocess_input() defined here, which calls _preprocess_numpy_input() defined here where we finally learn that in 'tf' mode we will use mean=[127.5 127.5 127.5] and scale=1/127.5
- We add the following to our convert.py, modeled after the colab we are following, section "Convert to TFLite" (we just need to change the location of our image files, and pre-processing):
IMAGE_SIZE = 224
def representative_data_gen():
dataset_list = tf.data.Dataset.list_files('dataset/*')
for i in range(100):
image = next(iter(dataset_list))
image = tf.io.read_file(image)
image = tf.io.decode_jpeg(image, channels=3)
image = tf.image.resize(image, [IMAGE_SIZE, IMAGE_SIZE])
image = tf.cast((image - 127.5) / 127.5, tf.float32)
image = tf.expand_dims(image, 0)
yield [image]
3. Quantize the model and convert to TFLite
We again add the following to our convert.py, modeled after the colab we are following, section "Convert to TFLite":
converter = tf.lite.TFLiteConverter.from_keras_model(model)
converter.optimizations = [tf.lite.Optimize.DEFAULT]
converter.representative_dataset = representative_data_gen
converter.target_spec.supported_ops = [tf.lite.OpsSet.TFLITE_BUILTINS_INT8]
converter.target_spec.supported_types = [tf.int8]
converter.inference_input_type = tf.uint8
converter.inference_output_type = tf.uint8
tflite_model = converter.convert()
with open('NASNetMobile_quant.tflite', 'wb') as f:
f.write(tflite_model)
We run the full convert.py (collating the 3 above snippets):
Which takes a while (maybe we should have installed GPU support after all), but eventually we get NASNetMobile_quant.tflite which is a quantized version of our original model.
Let's do a quick check and upload our quantized model to Lutz Roeder's great Netron online model inspection tool. Upload NASNetMobile_quant.tflite and inspect the various layers. In particular, if you expand the input, weight, bias, and output details of any Conv layer, you will see how the data is int8 with some associated quantization parameters.
4. Convert quantized TFLite model to EdgeTPU
- To convert from quantized TFLite to EdgeTPU, we wimply run:
edgetpu_compiler NASNetMobile_quant.tflite
- This will port as many layers and operations as possible for execution on the TPU. We see this:
Edge TPU Compiler version 16.0.384591198
Started a compilation timeout timer of 180 seconds.
Model compiled successfully in 5841 ms.
Input model: NASNetMobile_quant.tflite
Input size: 6.21MiB
Output model: NASNetMobile_quant_edgetpu.tflite
Output size: 8.15MiB
On-chip memory used for caching model parameters: 6.31MiB
On-chip memory remaining for caching model parameters: 0.00B
Off-chip memory used for streaming uncached model parameters: 635.12KiB
Number of Edge TPU subgraphs: 1
Total number of operations: 669
Operation log: NASNetMobile_quant_edgetpu.log
See the operation log file for individual operation details.
Compilation child process completed within timeout period.
Compilation succeeded!
- And we get NASNetMobile_quant_edgetpu.tflite that we will copy to JeVois-Pro microSD.
- Note
- Just a little bit too big! From the above messages, we are maxing out the on-board RAM, and 635 Kbytes of model parameters will need to be swapped in/out between that RAM and the main processor's RAM on every inference, in addition to streaming images over to the TPU.
- We can check the generated NASNetMobile_quant_edgetpu.log to confirm that in this case all layers are ported to TPU:
Edge TPU Compiler version 16.0.384591198
Input: NASNetMobile_quant.tflite
Output: NASNetMobile_quant_edgetpu.tflite
Operator Count Status
PAD 20 Mapped to Edge TPU
ADD 84 Mapped to Edge TPU
MAX_POOL_2D 4 Mapped to Edge TPU
MEAN 1 Mapped to Edge TPU
QUANTIZE 86 Mapped to Edge TPU
CONV_2D 196 Mapped to Edge TPU
CONCATENATION 20 Mapped to Edge TPU
FULLY_CONNECTED 1 Mapped to Edge TPU
RELU 48 Mapped to Edge TPU
MUL 4 Mapped to Edge TPU
SOFTMAX 1 Mapped to Edge TPU
STRIDED_SLICE 4 Mapped to Edge TPU
AVERAGE_POOL_2D 40 Mapped to Edge TPU
DEPTHWISE_CONV_2D 160 Mapped to Edge TPU
5. Create a zoo YAML file for our new model
Now we need to let JeVois know about our model, by creating a small YAML file that describes the model and locations of the files. We just take an entry from the pre-loaded JeVois tpu.yml (in Config tab of the GUI) for inspiration, and create our new NASNetMobile.yml:
%YAML 1.0
---
NASNetMobile:
preproc: Blob
nettype: TPU
postproc: Classify
model: "dnn/custom/NASNetMobile_quant_edgetpu.tflite"
intensors: "NHWC:8U:1x224x224x3:AA:0.0078125:128"
mean: "127.5 127.5 127.5"
scale: 0.0078125
classes: "coral/classification/imagenet_labels.txt"
classoffset: 1
- Note
- For
classes, we use an existing ImageNet label file that is already pre-loaded on our microSD, since we did not get one from Keras. Because that label file has a first entry for "background", which is not used in our model here, we use a classoffset of 1 to shift the class labels. You can adjust this at runtime in case labels seem off. If you use a custom-trained model, you should also copy a file NASNetMobile.labels to microSD, that describes your class names (one class label per line), and then set the classes parameter to that file.
6. Copy to microSD and run
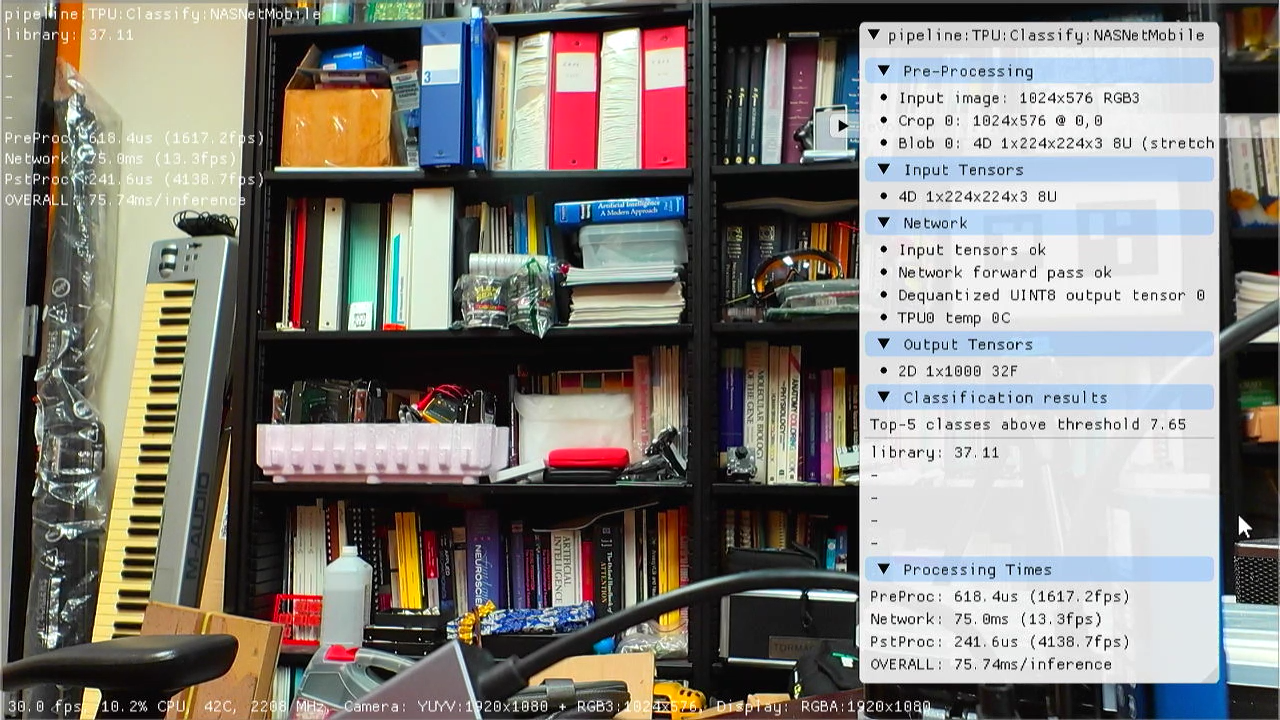
- Copy NASNetMobile_quant_edgetpu.tflite and NASNetMobile.yml to /jevoispro/share/dnn/custom/ on the JeVois-Pro microSD.
- Launch the DNN module and select
pipe TPU:Classify:NASNetMobile
- It works! Note that a TPU connected to USB 2.0 was used for this screenshot, speed is higher when using a PCIe TPU board.
Tips
- Models larger than 6.5 MB of weights can run quite well on the TPU, but will be slower. The caching if completely transparent to users and works very well.
- On JeVois-Pro, several Coral TPU pipelines can be simultaneously instantiated for several different models. The models will be automatically and transparently time-multiplexed over the hardware accelerator. For example, in JeVois modules MultiDNN or MultiDNN2, you can set several of the pipelines (in the params.cfg file of the module) to TPU models without any conflicts or issues even if you only have one TPU.
- If you have several TPUs, YAML parameter tpunum can be used to run a given model on a given TPU.
- Also see Tips for running custom neural networks
 1.9.8
1.9.8
