JeVois-A33 smart cameras by default use an Omnivision ov9653 1.3MP camera sensor. This is a very good overall sensor that is well matched to the available comptutation power of the processor inside the JeVois unit.
In some cases, however, one may want to use different optics or sensors.
The following options are available as a modification to an existing JeVois smart camera:
Sensor
Resolution
Shutter
Pixel size
Lens type
JeVois name
Omnivision ov9653 (standard)
1.3MP (1280x1024 max)
Rolling
3.18um x 3.18um
1/4 inch
ov9650
Omnivision ov7725
0.3MP (640x480 max)
Rolling
6.00um x 6.00um
1/4 inch
ov7725
OnSemi AR0135 color
1.2MP (1280x960 max)
Global
3.75um x 3.75um
M12 (12mm, S-mount)
ar0135
OnSemi AR0135 monochrome
1.2MP (1280x960 max)
Global
3.75um x 3.75um
M12 (12mm, S-mount)
ar0135
Omnivision ov2640
2.0MP (1600x1200 max)
Rolling
2.20um x 2.20um
1/4 inch
ov2640
Note
Sensors with M12 lens mounts require a new plastic case for your JeVois smart camera. They allow for the broadest range of possible lenses, from ultra wide angle to telephoto.
Global Shutter means that all pixels are sampled at the exact same time, as opposed to rolling shutter, which samples pixels one after the other in a raster-scan manner. Global shutter sensors are great for:
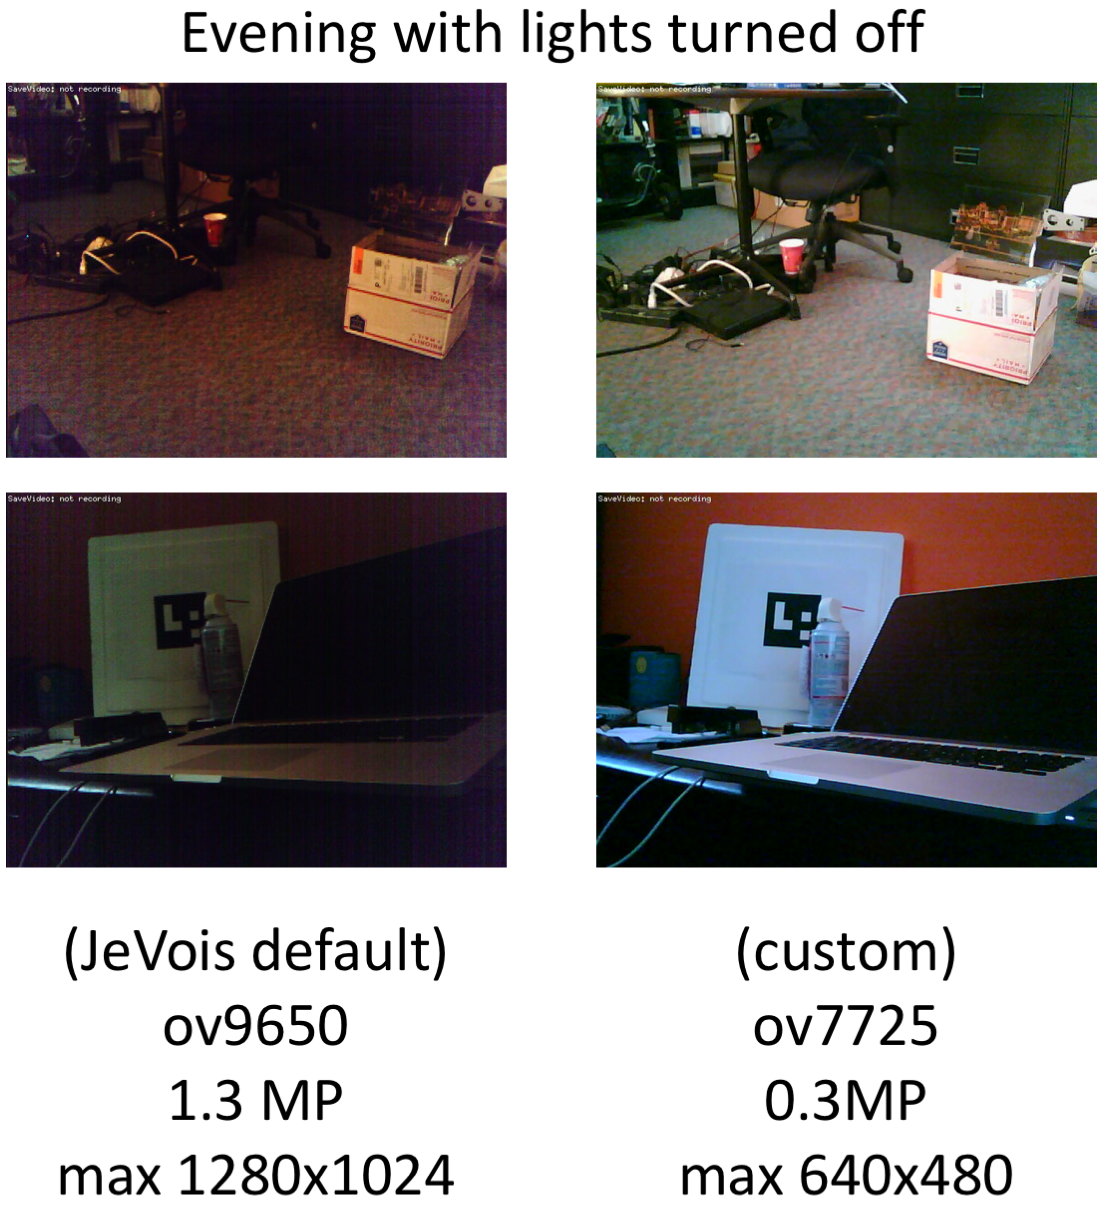
Typically, sensors with bigger pixels will have better low-light performance. Monochrome sensors also usually have better low-light performance. Refer to a given sensor's datasheet for more details.
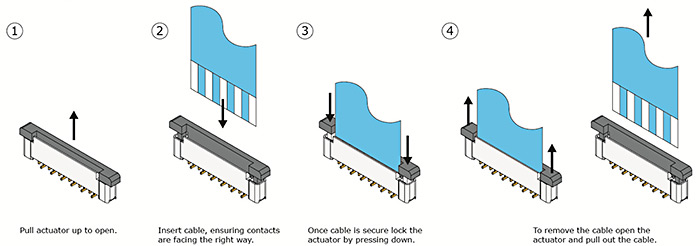
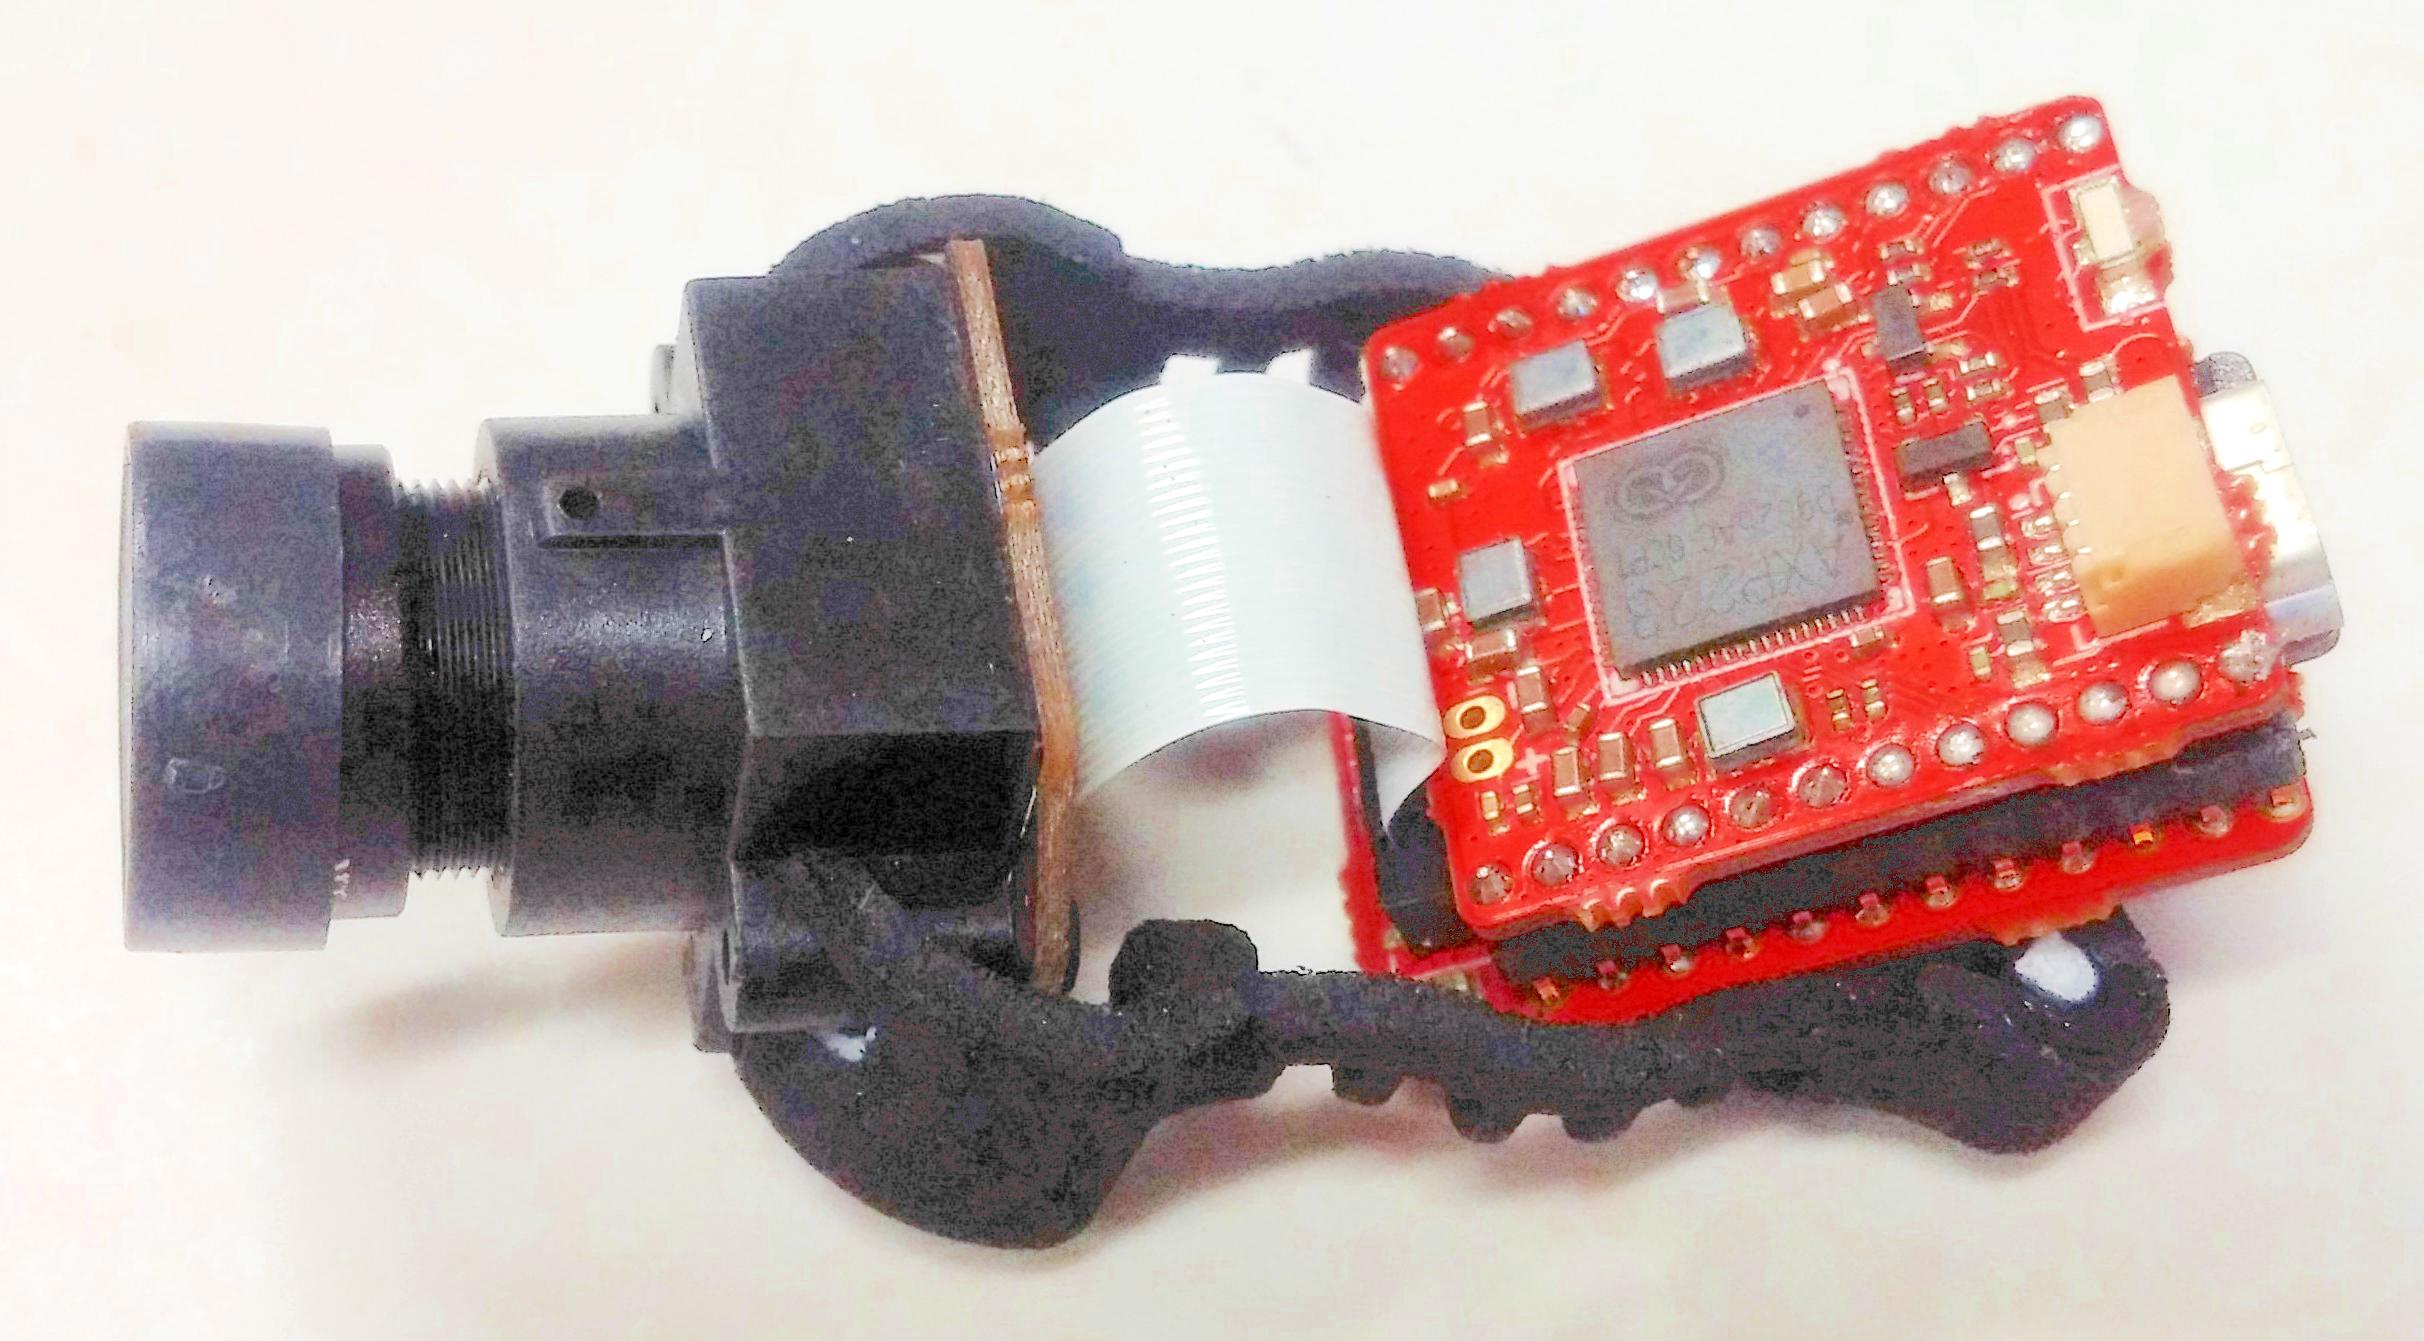
This requires some skills but can be done in less than 5 minutes. See the video below for full details.
Be careful with the camera connector to not pull too much on the tabs. They should only slide out by about 2mm.
JeVois smart camera configuration
Note
With JeVois software JeVois v1.14 and later, this is optional: the sensor type is automatically detected at start up. But you may still want to select it as described below, as this will accelerate the JeVois start up time a bit, by avoiding that JeVois tries all known sensors one after the other.
To let your JeVois smart camera know that you have installed a new sensor, you need to indicate the sensor's name in a special configuration file on the microSD of your JeVois unit.
Insert microSD into desktop or laptop
Browse the BOOT partition
Using any editor, create a plain text file in that directory named sensor
Write a single line of plain ASCII text in that file with the JeVois name listed above.
For example (after installing an ov7725 sensor):
Linux:echo ov7725 > /media/${USER}/BOOT/sensor
Mac:echo ov7725 > /Volumes/BOOT/sensor
Windows: use Notepad to create and save the file. Make sure there is no extension (i.e., it is named sensor and not sensor.txt).
Which sensor does my JeVois camera have?
In the Console of JeVois Inventor, type:
getpar camerasens
Sensor specific information
Omnivision ov7725
This sensor offers better low-light performance than the default JeVois sensor, thanks to its bigger pixels. On the flip side, its resolution is lower. It can also grab at 60fps at 640x480 (original sensor can only do 30fps at that resolution), but it is limited to 60fps and cannot grab at 120fps like the original sensor.
Use this sensor if you feel that the original sensor is struggling in low light and you would like to sustain a high framerate in low light (otherwise, see Optimizing performance under different lighting conditions for tips on how to increase exposure time, when needed, by dynamically adjusting framerate on the original ov9653 sensor).
This sensor supports: YUYV, BAYER, RGB565
VGA ( 640 x 480): up to 60 fps
CIF ( 352 x 288): up to 60 fps
QVGA ( 320 x 240): up to 60 fps
QCIF ( 176 x 144): up to 60 fps
QQVGA ( 160 x 120): up to 60 fps
QQCIF ( 88 x 72): up to 60 fps
OnSemi (Aptina) AR0135
Note
This sensor is primarily intended for industrial machine vision and hence has fewer automatic image enhancements than the consumer-grade Omnivision sensors. Only auto-gain and auto-exposure are available, no auto white balance.
This sensor only supports RAW BAYER or GRAY output format (depending on whether you have the color or monochrome version). The JeVois core software JeVois v1.12 and later is able to convert on the fly from BAYER or GRAY to YUYV, allowing you to still run the vast majority of JeVois modules, which expect YUYV pixel format. However, there is a cost to this (the JeVois processor has to convert from BAYER or GRAY to YUYV). When operating in headless mode (no video out to the USB port), you can eliminate that extra cost by using BAYER as the camera pixel format and making sure your code can handle that (e.g., no problem if you will just do a getCvBGR() or similar on the input frame, that function can convert from anything, including BAYER, to BGR).
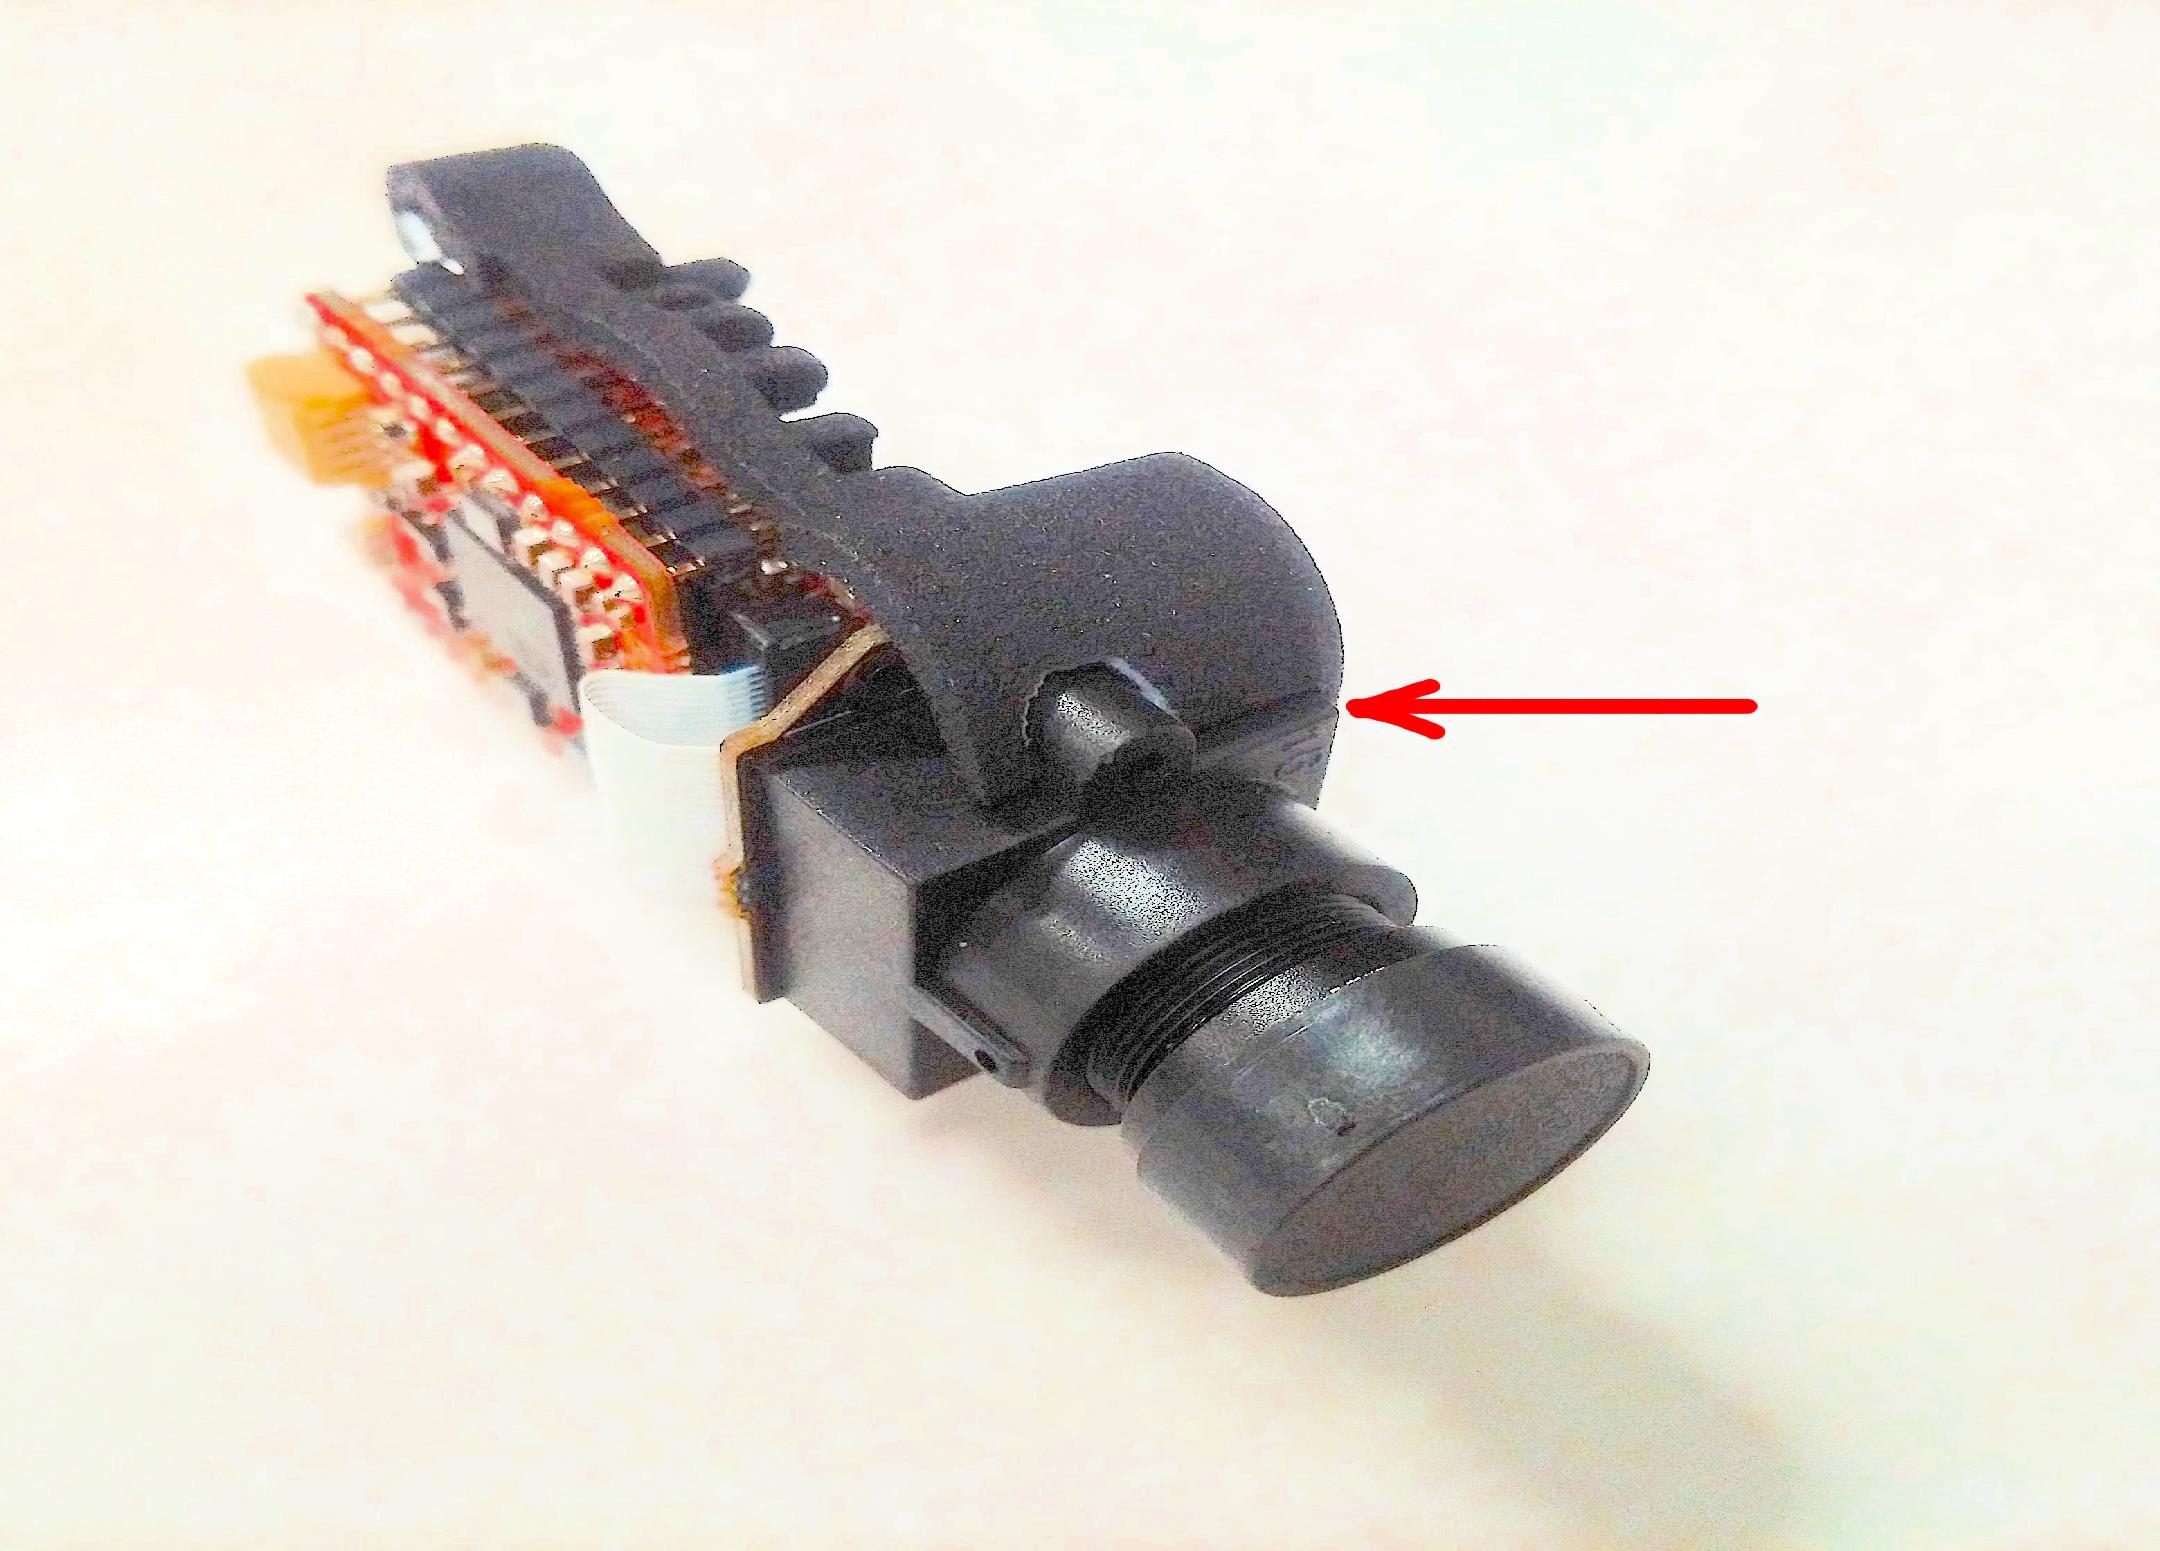
This sensor requires a custom plastic case for your JeVois unit. Instructions are roughly as in the installation video above, just be careful to make sure the sensor is pulled towards the front of the case as far as it will go:
This sensor supports: BAYER or MONO (depending on which model you have), with on-the-fly conversion to YUYV using the JeVois CPU
SXGA (1280 x 960): up to 54 fps
720p (1280 x 720): up to 60 fps
VGA ( 640 x 480): up to 54 fps (binned version of SXGA)
360p ( 640 x 360): up to 60 fps
QVGA ( 320 x 240): up to 54 fps (central crop of binned version of SXGA)
180p ( 320 x 180): up to 60 fps
QQVGA ( 160 x 120): up to 54 fps (central crop of binned version of SXGA)
90p ( 160 x 90): up to 60 fps
Note
As of this writing we are not able to achieve the highest frame rates advertised by the manufacturer in all resolutions. Planning on 30fps is a safer bet right now.
We added an awsome IMU (inertial measurement unit) to this sensor, a TDK/InvenSense ICM-20948.
The specifications of this chip are quite impressive:
3-axis 16-bit accelerometer with full-range sensitivity selectable to +/-2g, +/-4g, +/-8g, and +/-16g.
Accelerometer data rate from 4 Hz to 1125 Hz.
3-axis 16-bit gyroscope with full-range sensitivity selectable to +/-250dps (degrees/s), +/-500dps, +/-1000dps, and +/-2000dps.
Gyroscope data rate from 4 Hz to 1125 Hz.
3-axis 16-bit magnetometer (compass) with wide range of +/-4900uT (micro Tesla).
Magnetometer data rates 10 Hz, 20 Hz, 50 Hz, or 100 Hz.
16-bit temperature sensor with readout rate of up to 8 kHz.
RAW data mode (get current sensor values at any time), buffered (FIFO) data mode (sensor values accumulate into a FIFO at a fixed rate), and digital motion processing mode (DMP; raw data is processed on-chip).
On-chip digital motion processor (DMP) can compute, inside the IMU chip itself:
quaternion 6 (uses accel + gyro),
quaternion 9 (uses accel + gyro + compass),
geomag quaternion (uses accel + compass),
flip/pickup detection,
step detection and counting,
basic activity recognition: drive, walk, run, bike, tilt, still.
With quaternions computed on-chip, with an algorithm that gets sensor data at a highly accurate, fixed rate, and applies various calibrations, drift corrections, and compensations on the fly, one gets highly accurate real-time estimate of the sensor's pose in the 3D world and of how it is moving.
Note that communication with the IMU is over a 400kHz I2C bus, which may limit data readout rate depending on which data is requested from the IMU.
This IMU has 3 basic modes of operation (parameter mode which can only be set in params.cfg):
RAW: One can access the latest raw sensor data at any time using the getRaw() or get() functions. This is the simplest mode of operation. One disadvantage is that if you are not calling get() at a perfectly regular interval, there will be some time jitter in your readouts. The IMU does not provide any time stamps for its data.
FIFO: In this mode, data from the sensor is piled up into a 1 kbyte FIFO buffer at a precise, constant rate (when all three of accelerometer, gyroscope, and magnetometer are on, the gyro rate determines the FIFO buffering rate). Main advantage is that you can then read out the data without having to worry about calling getRaw() or get() at a highly precise interval. But you need to be careful that the FIFO can fill up and overflow very quickly when using high sensor data rates.
DMP: In this mode, data is captured from the sensor at an accurate, fixed rate, and is fed to the on-chip digital motion processor (DMP). The DMP then computes quaternions, activity recognition, etc and pushes data packets into the FIFO as results from these algorithms become available.
Omnivision ov2640
The main advantage of this sensor is its higher resolution. However, this comes at a price: light sensitivity is not as good, machine vision processing will likely be slow, at high resolutions framerate may be limited by USB 2.0 transfer speed (up to 24 MByte/s for video data).
Use this sensor if you want to detect small objects far away and you do not need very high frame rate. For example, detecting ArUco markers of barcodes works very well with this sensor.
This sensor supports: YUYV, BAYER, RGB565
UXGA (1600 x 1200): up to 15 fps
SXGA (1280 x 1024): up to 15 fps
720p (1280 x 720): up to 15 fps
XGA (1024 x 768): up to 15 fps
SVGA ( 800 x 600): up to 40 fps
VGA ( 640 x 480): up to 40 fps
CIF ( 352 x 288): up to 60 fps
QVGA ( 320 x 240): up to 60 fps
QCIF ( 176 x 144): up to 60 fps
QQVGA ( 160 x 120): up to 60 fps
QQCIF ( 88 x 72): up to 60 fps
Note
The housing for this sensor is 1mm larger than for the ov9650 and ov7725. Hence, the case of your JeVois smart caera will not fully close in the front after this sensor is installed. This is to be expected, there will be an approximately 1mm gap between the top and bottom of the plastic JeVois camera case.
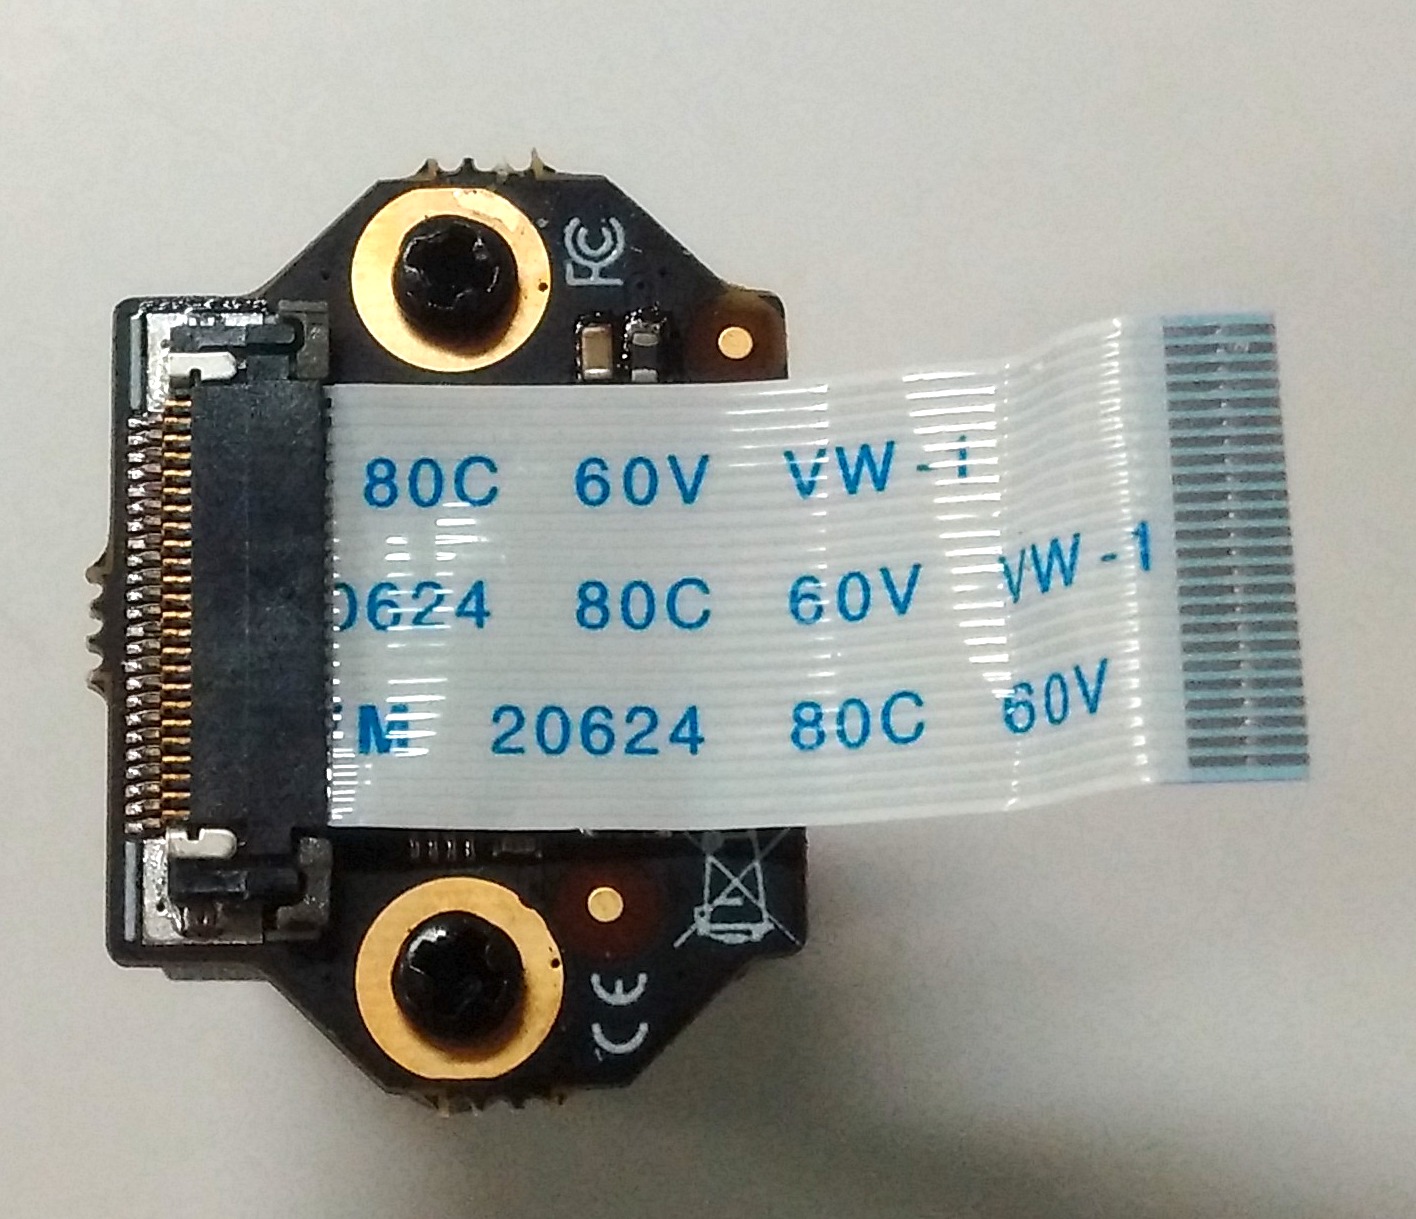
Which one is which?
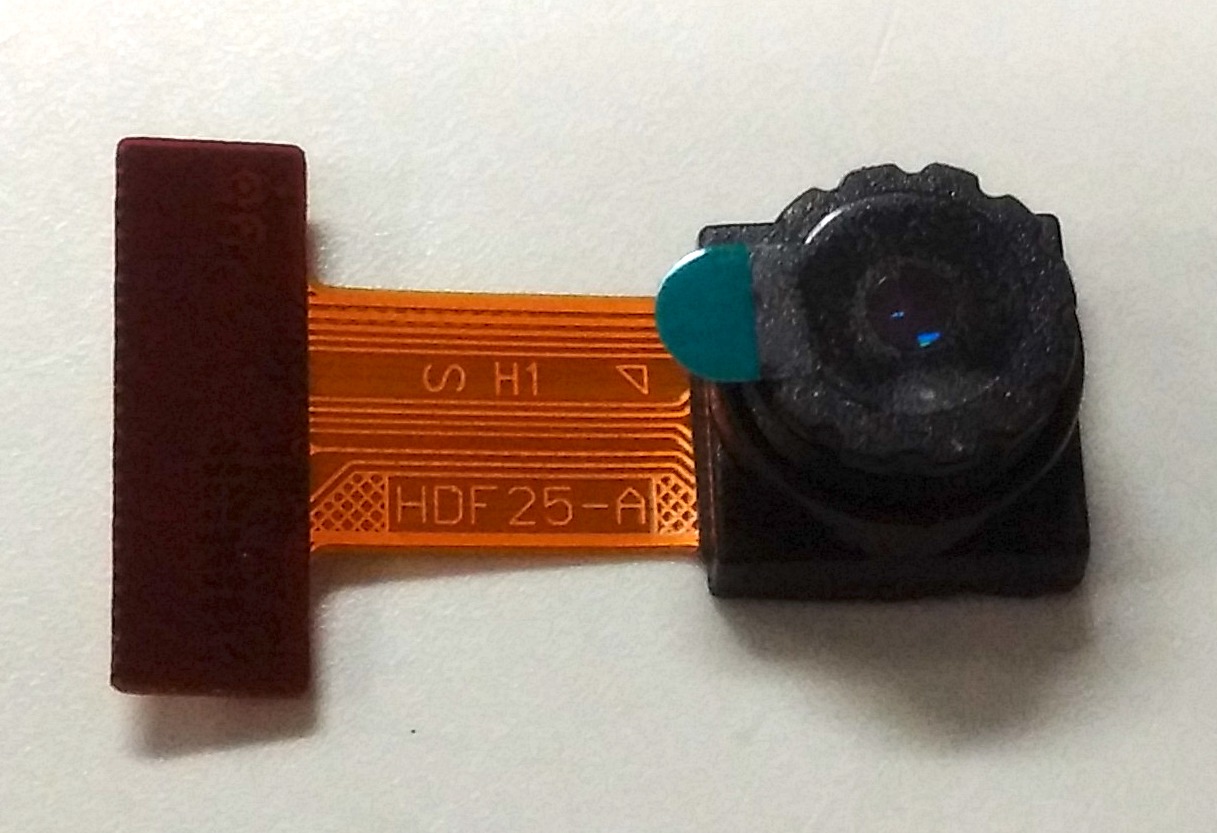
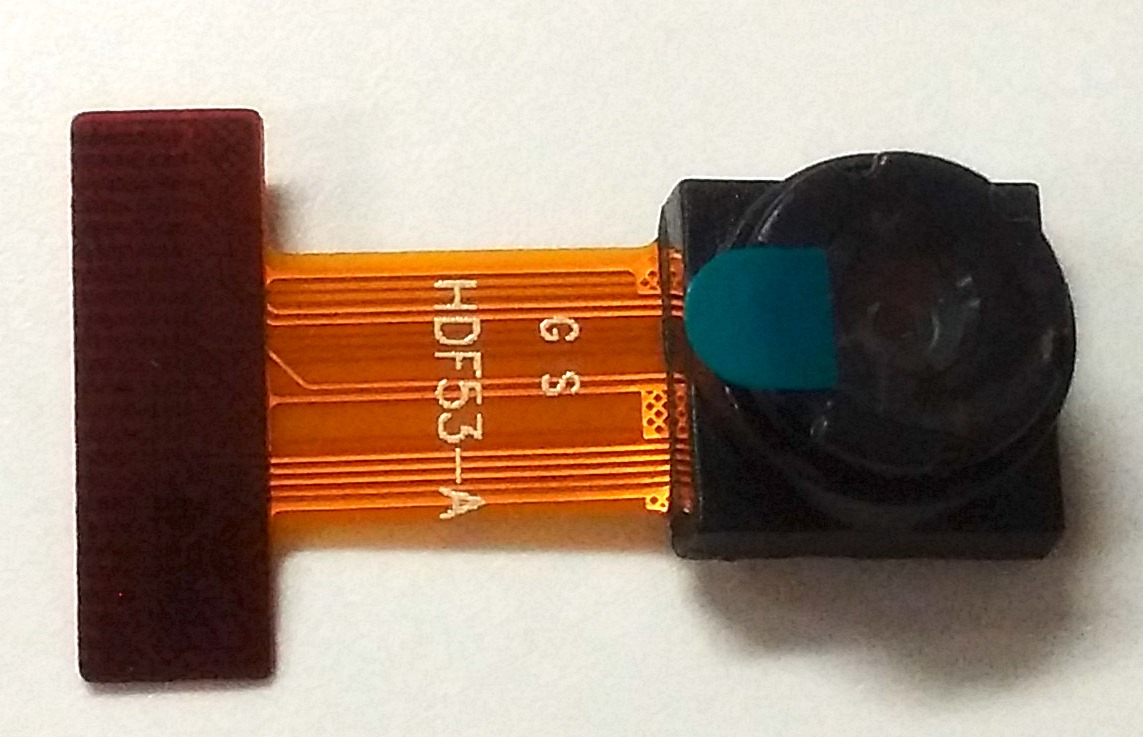
The Omnivision sensor modules look almost identical. Look for markings on the flat flex cable that connect the sensor to the JeVois circuit board:
HDF-25 or HDF-7725: is an ov7725
HDF-53: is an ov9653
HDF3M: is in ov2640
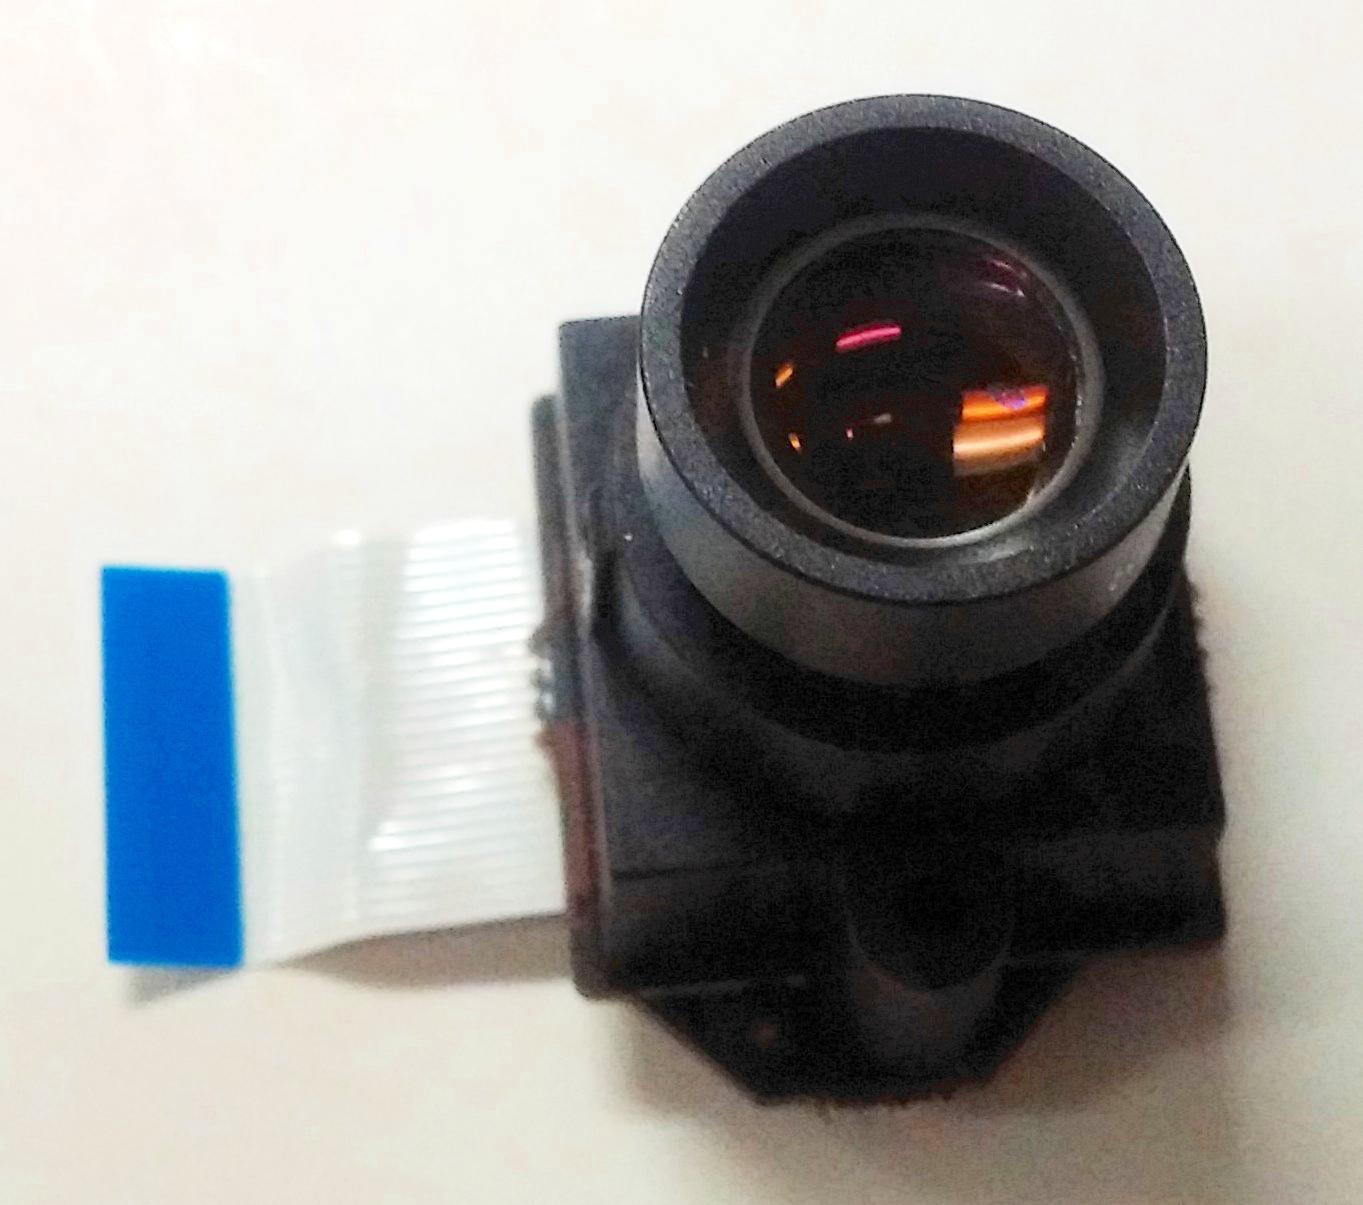
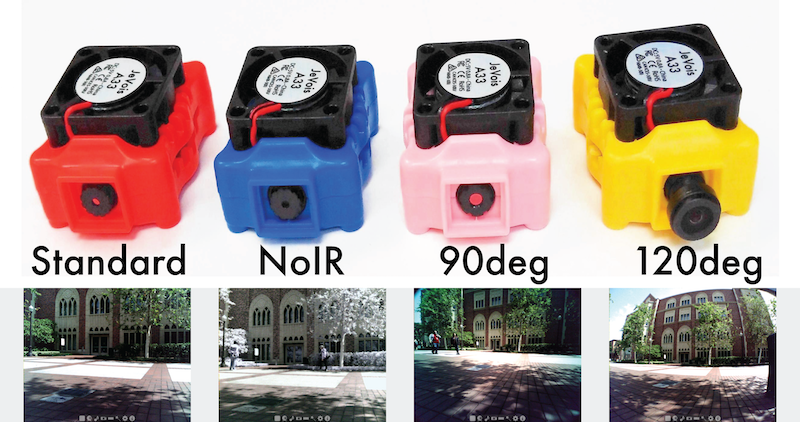
As far as lenses:
Standard and NOIR have the smallest lens hole. NOIR has no glue on the lens thread while Standard is glued.
90deg has a slightly bigger hole than Standard and NOIR.
120deg is much bigger and easy to recognize.
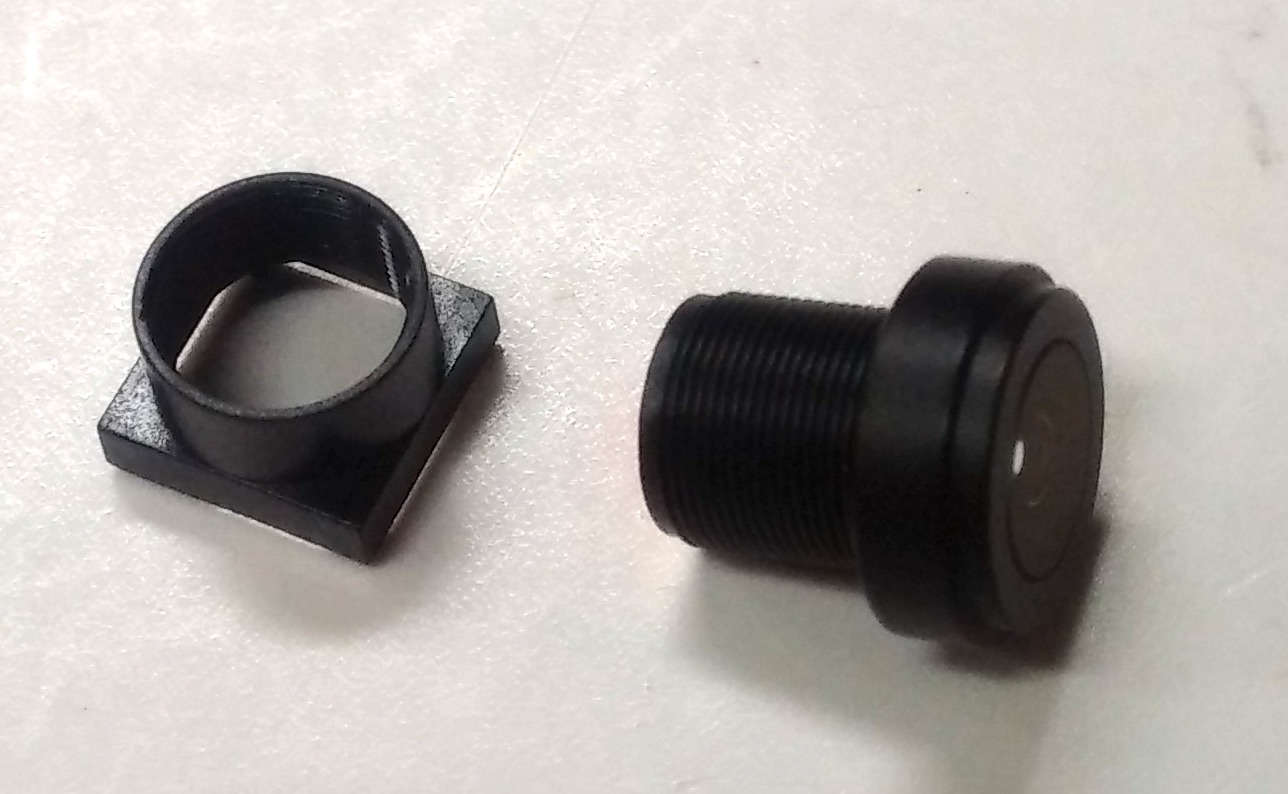
You may have received extra lenses which sometimes are screwed into a square shroud for protection. You should unscrew the shroud before attempting to install the lens onto your JeVois camera. You can discard the shroud:


 1.9.8
1.9.8
