|
JeVois Tutorials
1.23
JeVois Smart Embedded Machine Vision Tutorials
|

|
|

Loading...
Searching...
No Matches
|
JeVois Tutorials
1.23
JeVois Smart Embedded Machine Vision Tutorials
|
|
|
In this tutorial we create and compile a new JeVois machine vision module from scratch, and we run it on both the host computer (for testing) and on the JeVois platform hardware.
We will develop a module that just streams video from the camera sensor to the host computer, adding a message "Hello JeVois" on top of each video frame.
We follow the instructions in Programmer SDK and writing new modules to get started with our new module. Here, for a standalone module, we will use the helper script jevois-create-module, which takes two arguments: vendor name (this is used so that modules with the same name can exist if they have been created by different people), and module name. Here we hence type:
cd
jevois-create-module Tutorial HelloJeVois
which will create a directory hellojevois and populate it with some skeleton files:
hellojevois/
├── CMakeLists.txt
├── COPYING
├── INSTALL
├── README
├── rebuild-host.sh
├── rebuild-platform.sh
└── src
    └── Modules
        └── HelloJeVois
            ├── HelloJeVois.C
            ├── icon.png
            ├── postinstall
            └── screenshot1.png
The source file for our module is hellojevois/src/Modules/HelloJeVois.C
See Programmer SDK and writing new modules for more information about the files created here.
Let us make sure our host compilation environment works. Indeed, the skeleton code created by jevois-create-module should compile out of the box. To compile on host, we run the following commands from a terminal:
cd hellojevois
./rebuild-host.sh
which creates a directory called hbuild that will contain all the intermediary build files for compilation for the host, and yields
-- JeVois version 1.0
-- JEVOIS_SRC_ROOT: /lab/itti/jevois/software/jevois
-- JEVOIS_PLATFORM: OFF
-- JEVOIS_VENDOR: Tutorial
-- Install prefix for executables: /usr/local
-- Host path to jevois modules root: /jevois
-- The C compiler identification is GNU 5.2.1
-- The CXX compiler identification is GNU 5.2.1
-- Check for working C compiler: /usr/bin/cc
-- Check for working C compiler: /usr/bin/cc -- works
-- Detecting C compiler ABI info
-- Detecting C compiler ABI info - done
-- Detecting C compile features
-- Detecting C compile features - done
-- Check for working CXX compiler: /usr/bin/c++
-- Check for working CXX compiler: /usr/bin/c++ -- works
-- Detecting CXX compiler ABI info
-- Detecting CXX compiler ABI info - done
-- Detecting CXX compile features
-- Detecting CXX compile features - done
-- Adding compilation directives for module HelloJeVois base src/Modules
-- Configuring done
-- Generating done
-- Build files have been written to: /lab/itti/hellojevois/hbuild
Scanning dependencies of target modinfo_HelloJeVois
[ 50%] Generating ../src/Modules/HelloJeVois/modinfo.yaml, ../src/Modules/HelloJeVois/modinfo.html
[ 50%] Built target modinfo_HelloJeVois
Scanning dependencies of target HelloJeVois
[100%] Building CXX object CMakeFiles/HelloJeVois.dir/src/Modules/HelloJeVois/HelloJeVois.C.o
Linking CXX shared library HelloJeVois.so
[100%] Built target HelloJeVois
[sudo] password for itti:
[ 50%] Built target modinfo_HelloJeVois
[100%] Built target HelloJeVois
Install the project...
-- Install configuration: ""
-- Installing: /jevois/modules/Tutorial/HelloJeVois
-- Installing: /jevois/modules/Tutorial/HelloJeVois/postinstall
-- Installing: /jevois/modules/Tutorial/HelloJeVois/modinfo.yaml
-- Installing: /jevois/modules/Tutorial/HelloJeVois/screenshot1.png
-- Installing: /jevois/modules/Tutorial/HelloJeVois/modinfo.html
-- Installing: /jevois/modules/Tutorial/HelloJeVois/icon.png
-- Installing: /jevois/modules/Tutorial/HelloJeVois/HelloJeVois.so
-- Removed runtime path from "/jevois/modules/Tutorial/HelloJeVois/HelloJeVois.so"
The module was compiled for the host architecture (here, an Intel processor) and was installed into target directory /jevois/modules/Tutorial/HelloJeVois/ where it is now ready for use.
Let us also try to cross-compile the module for the JeVois smart camera hardware (ARM processor):
./rebuild-platform.sh
which creates a drectory called pbuild that will contain all the intermediary build files for compilation for the platform, and yields
-- JeVois version 1.0
-- JEVOIS_SRC_ROOT: /lab/itti/jevois/software/jevois
-- JEVOIS_PLATFORM: ON
-- JEVOIS_VENDOR: Tutorial
-- JEVOIS_MODULES_TO_BUILDROOT: OFF
-- Install prefix for executables: /lab/itti/jevois/software/jevois/../jevois-sdk/out/sun8iw5p1/linux/common/buildroot/target/usr
-- Host path to jevois modules root: /lab/itti/jevois/software/jevois/../jevois-sdk/out/sun8iw5p1/linux/common/buildroot/target/jevois
-- The C compiler identification is GNU 6.1.0
-- The CXX compiler identification is GNU 6.1.0
-- Check for working C compiler: /lab/itti/jevois/software/jevois/../jevois-sdk/out/sun8iw5p1/linux/common/buildroot/host/usr/bin/arm-buildroot-linux-gnueabihf-gcc
-- Check for working C compiler: /lab/itti/jevois/software/jevois/../jevois-sdk/out/sun8iw5p1/linux/common/buildroot/host/usr/bin/arm-buildroot-linux-gnueabihf-gcc -- works
-- Detecting C compiler ABI info
-- Detecting C compiler ABI info - done
-- Detecting C compile features
-- Detecting C compile features - done
-- Check for working CXX compiler: /lab/itti/jevois/software/jevois/../jevois-sdk/out/sun8iw5p1/linux/common/buildroot/host/usr/bin/arm-buildroot-linux-gnueabihf-g++
-- Check for working CXX compiler: /lab/itti/jevois/software/jevois/../jevois-sdk/out/sun8iw5p1/linux/common/buildroot/host/usr/bin/arm-buildroot-linux-gnueabihf-g++ -- works
-- Detecting CXX compiler ABI info
-- Detecting CXX compiler ABI info - done
-- Detecting CXX compile features
-- Detecting CXX compile features - done
-- Adding compilation directives for module HelloJeVois base src/Modules
-- Configuring done
-- Generating done
-- Build files have been written to: /lab/itti/hellojevois/pbuild
Scanning dependencies of target modinfo_HelloJeVois
[ 50%] Built target modinfo_HelloJeVois
Scanning dependencies of target HelloJeVois
[100%] Building CXX object CMakeFiles/HelloJeVois.dir/src/Modules/HelloJeVois/HelloJeVois.C.o
Linking CXX shared library HelloJeVois.so
[100%] Built target HelloJeVois
[ 50%] Built target modinfo_HelloJeVois
[100%] Built target HelloJeVois
Install the project...
-- Install configuration: ""
-- Installing: /lab/itti/hellojevois/jvpkg/modules/Tutorial/HelloJeVois
-- Installing: /lab/itti/hellojevois/jvpkg/modules/Tutorial/HelloJeVois/postinstall
-- Installing: /lab/itti/hellojevois/jvpkg/modules/Tutorial/HelloJeVois/modinfo.yaml
-- Installing: /lab/itti/hellojevois/jvpkg/modules/Tutorial/HelloJeVois/screenshot1.png
-- Installing: /lab/itti/hellojevois/jvpkg/modules/Tutorial/HelloJeVois/modinfo.html
-- Installing: /lab/itti/hellojevois/jvpkg/modules/Tutorial/HelloJeVois/icon.png
-- Installing: /lab/itti/hellojevois/jvpkg/modules/Tutorial/HelloJeVois/HelloJeVois.so
-- Removed runtime path from "/lab/itti/hellojevois/jvpkg/modules/Tutorial/HelloJeVois/HelloJeVois.so"
The module has been cross-compiled for the JeVois processor and the resulting files have been copied to ~/hellojevois/jvpkg/, where they are ready to be packaged into a single JeVois package file that can later be copied to microSD and run on the smart camera. Before we do that, let us actually implement our module, i.e., write the Hello JeVois message on the video frames.
The skeleton code already provides an initial implementation for the HelloJeVois class, and for its process() function. It actually even already writes "Hello JeVois". So Let us just have a look at that code and it seems that we will not need to modify much (if anything) for this tutorial:
jevois::rawimage::writeText(outimg, "Hello JeVois!", 100, 230, jevois::yuyv::White, jevois::rawimage::Font20x38);
For fun, let us modify line 66 and add a couple more writeText() calls:
Since we have already run rebuild-host.sh once and we have not added any new file since them (which would require that we run CMake again to detect them, for example by running rebuild-host.sh again), we can just use the partial compilation commands detailed in Programmer SDK and writing new modules (but note that, since we only have one file to compile here, this does not save us much time):
cd hbuild
make
sudo make install
Assuming that all of JeVois has been compiled previously, jevois-daemon should already exist and be ready to go. However, we need to add a new video mapping to /jevois/config/videomappings.cfg to let it know when and how to use our new module. We edit /jevois/config/videomappings.cfg (may require sudo if you get some permission denied error), and add a line:
YUYV 640 480 28.5 YUYV 640 480 28.5 Tutorial HelloJeVois
Or, with JeVois v1.3 and later, you can just type, in a Linux terminal:
sudo jevois-add-videomapping YUYV 640 480 28.5 YUYV 640 480 28.5 Tutorial HelloJeVois
Thus, the JeVois engine will now run module HelloJeVois from vendor Tutorial when video resolution 640x480 @ 28.5fps is requested. See Advanced topic: Video mappings and configuring machine vision modes for more info.
Now we need a regular webcam to test this, which should support YUYV 640x480 (frame rate not critical). Hopefully you have one. Of course we could use our JeVois camera configured in PassThrough mode to act like a regular dumb camera, but some people seem to be confused by this, so it may not be appropriate for this entry-level tutorial. If you do not have a regular USB webcam, just skip to the next section.
Start by just running
jevois-daemon
which will probably start in another mode (like DemoSaliency). Then, in the terminal in which you started jevois-daemon, type
listmappings
and note the mapping number for the one that we just added and that uses our HelloJevois module. For us it was mapping 16:
...
   16 - OUT: YUYV 640x480 @ 28.5fps CAM: YUYV 640x480 @ 28.5fps MOD: Tutorial:HelloJeVois
...
See Command-line interface user guide for more info about sending commands to JeVois and about the listmappings command.
So now just hit CTRL-C to stop jevois-daemon, and start it again using mapping 16 (or whatever that number was for you):
jevois-daemon --videomapping=16
You should see something like that in your terminal:
INF Engine::Engine: Loaded 44 vision processing modes.
ERR Engine::onParamChange: Cannot set cpu max frequency -- IGNORED
ERR Engine::onParamChange: Cannot set cpu frequency governor mode -- IGNORED
INF Engine::onParamChange: Using [stdio] hardware (4-pin connector) serial port
INF Engine::onParamChange: No USB serial port used
INF Engine::postInit: Starting camera device /dev/video0
ERR Engine::postInit: Could not access VFE turbo parameter -- IGNORED
INF Camera::Camera: [12] V4L2 camera /dev/video0 card JeVois-A33 Smart Camera bus usb-0000:09:00.0-1.1.4
INF Engine::postInit: Using display for video output
init done
INF Engine::setFormatInternal: OUT: YUYV 640x480 @ 28.5fps CAM: YUYV 640x480 @ 28.5fps MOD: Tutorial:HelloJeVois
INF Camera::setFormat: Camera set video format to 640x480 YUYV
INF Engine::setFormatInternal: Instantiating dynamic loader for /jevois/modules/Tutorial/HelloJeVois/HelloJeVois.so
INF Engine::setFormatInternal: Module [HelloJeVois] loaded, initialized, and ready.
INF Camera::streamOn: 6 buffers of 614400 bytes allocated
INF READY JEVOIS 1.0
and this in a window:
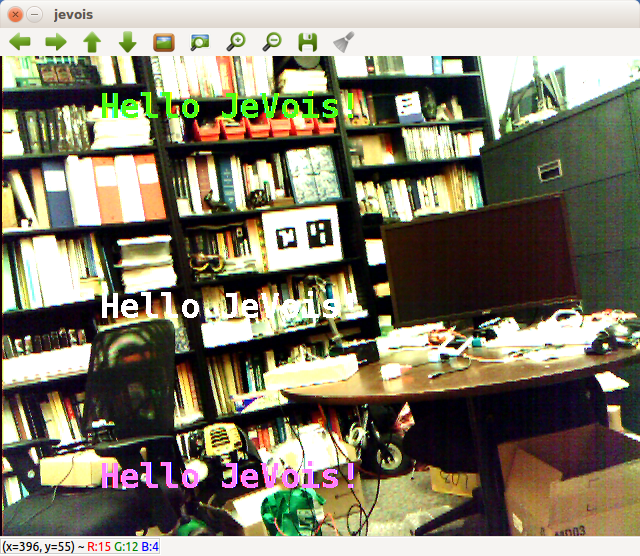
Let us add a small title in the top-left corner, and also a display of frames/s, CPU frequency, and temperature at the bottom, like in the other JeVois demos. For this, we will use the jevois::Timer class.
Indeed, the JeVois framework provides a convenient jevois::Timer classes to help you measure how much time it takes to process each video frame. It works as follows:
start() on the timer object to indicate start of frame (start of process() function). Do this just after you have received the frame from the camera, so you do not include wait time for that frame.stop() commandThe timer class will accumulate average statistics over 100 frames and will display those once in a while as information messages. In addition to writing messages to the console, stop() returns a string we can directly write onto our video frames. Timer does not report stats on every frame as this could slow us down too much, especially if sending those reports over serial port.
Let us first include the Timer declarations so we can use it:
and then we add it to our process() function, also adding the message at the top of the frame. The modified process() function now looks like this, with //////////////////////////////////////////////////////// markers to help you see the modifications (note that here we configured the timer to report every 60 frames, and to output text reports at the LOG_DEBUG level, which will not be printed out to console by default):
To re-compile and re-install the module, we just type:
cd hbuild
make && sudo make install
And we can start jevois-daemon again and the output now looks like this (pointing the camera to something darker so we can see the small white text):
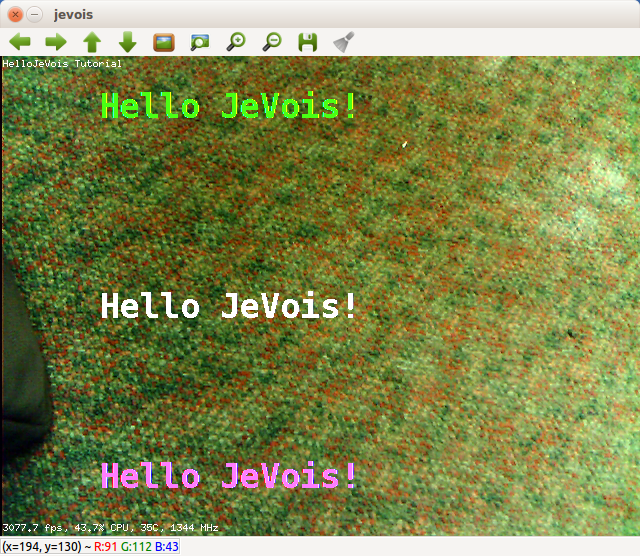
This framerate is fast (this is a $15,000 host computer). We are now happy with our module. Let us run it inside the JeVois camera.
Since we have already run rebuild-platform.sh on our module and we have not added any new file since then, we can just do a partial re-compilation for platform:
cd ~/hellojevois/pbuild
make && sudo make install && make jvpkg
rebuild-platform.sh in your jevois directory first.This will compile and then pack all the module's files into a .jvpkg package. You can drop that package into JEVOIS:/packages/ on your microSD. Next time it starts up, JeVois will unpack, install, and then delete the package.
One last thing before we install to the camera is that we will include with our module an additional video mapping that we want to be automatically added to the videomappings.cfg of our JeVois camera as the module gets installed. For this, we edit ~/hellojevois/src/Module/HelloJeVois/postinstall as follows:
When the module is installed onto the smart camera, this mapping will automatically be added to the list of existing mappings. This will be achieved by JeVois automatically running the postinstall script that is in the directory of our module. If such script exists, it will be run just after the package is unpacked. It will be run with the current directory set to the directory of the module. By default, postinstall contains simple commands that just append the videomappings.cfg of the new module to the main videomappings.cfg of JeVois, but you can edit this script if you need additional custom configurations to be run as your package is installed.
Let us create a package with all the files of our module:
cd ~/hellojevois/pbuild
make jvpkg
which creates ~/hellojevois/Tutorial_hellojevois.jvpkg that contains everything needed to install this module onto our smart camera.
We connect the microSD card of our smart camera to our host computer and we copy the package file to JEVOIS:/packages/ on the microSD card. Next time we start up the smart camera, it will unpack the package, install the module .so file, run the postinstall script which will update the video mappings, etc and we will be ready to go. Something like this:
cp Tutorial_hellojevois.jvpkg /media/itti/JEVOIS/packages/
(replace itti above by your username). Then insert the microSD into our JeVois smart camera and start it up.
usbsd to the JeVois command-line interface (see Command-line interface user guide). Make sure JeVois is not streaming video. Then either connect to it using a terminal and send the usbsd command, or, for short, you can just type on your host: echo usbsd | sudo tee /dev/ttyACM0.cp Tutorial_hellojevois.jvpkg /media/<em>username</em>/JEVOIS/packages/With JeVois v1.2 and later, you can just type jevois-usbsd start to start exporting th emicroSD, and jevois-usbsd stop to eject it and restart JeVois.
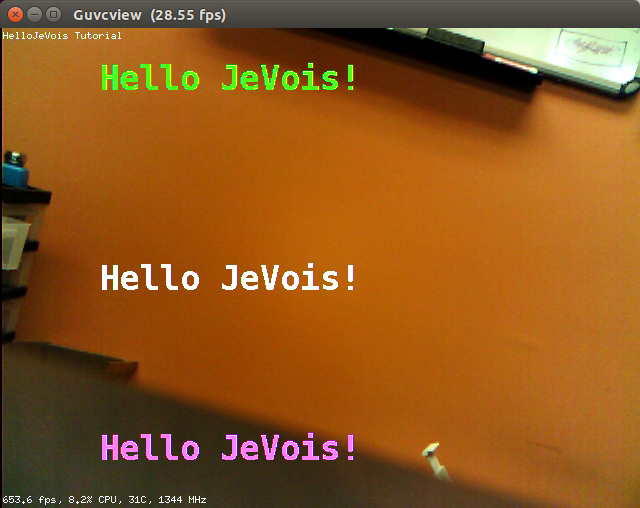
Start guvcview on your host computer. Note that JeVois may take a bit more time to boot up as it is unpacking and installing our module. This is will be done this time only, and the package will be deleted from microSD once all its files have been installed.
Set guvcview to YUYV 640x480 and you will notice the new 28.5fps framerate (will show up as 57/2 in some versions of guvcview). Select it and here you are:
If things go wrong here (the JeVois smart camera fails to start after you copied that .jvpkg file to JEVOIS:/packages/, or the 640x480 @ 28.5fps mode does not appear in guvcview), check the following:
Use this method if you want to reflash the entire microSD using the latest operating system, core files, etc provided by jevois-sdk.
The entire operating system for JeVois is created under the jevois-sdk and the resulting files are placed into two staging directories: /var/lib/jevois-build for system files, and /var/lib/jevois-microsd for files that will go into the JEVOIS partition. See Organization of JeVois files on host and platform for details. It can then be installed onto a fresh new microSD card.
To include your new module into the staging area, run this:
cd ~/hellojevois
./rebuild-platform.sh
which will copy all the files to the staging area.
If you have a postinstall script in your module that adds new video mappings, those will still get appended to the main videomappings.cfg next time JeVois reboots.
Then you can flash a new microSD card as usual (see Flashing to microSD card):
sudo jevois-flash-card -y /dev/sdX
(replace sdX above by the device for your microSD).
 1.9.8
1.9.8