JeVois v1.9.0
In this tutorial, we program an Arduino to decode the results of JeVois modules that detect and identify multiple object in scenes, sending one message with information about the bounding box, object category, and recognition score for each detection.
Example modules with these outputs are DarknetYOLO, TensorFlowSaliency, DetectionDNN, and DarknetSaliency.
This tutorial directly builds on JeVois + Arduino: blink for X, which you go through first.
Setting up
- We start with the same Arduino board and hardware hookup as in JeVois + Arduino: blink for X
- The message format that these modules output is described in Standardized serial messages formatting, in the section on Object detection + recognition messages, which itself refers to the section on Two-dimensional (2D) location messages. Indeed, the messages describe the bounding box of the object (2D location message), with information about object category and recognition scores in the id and extra fields of the 2D location messages.
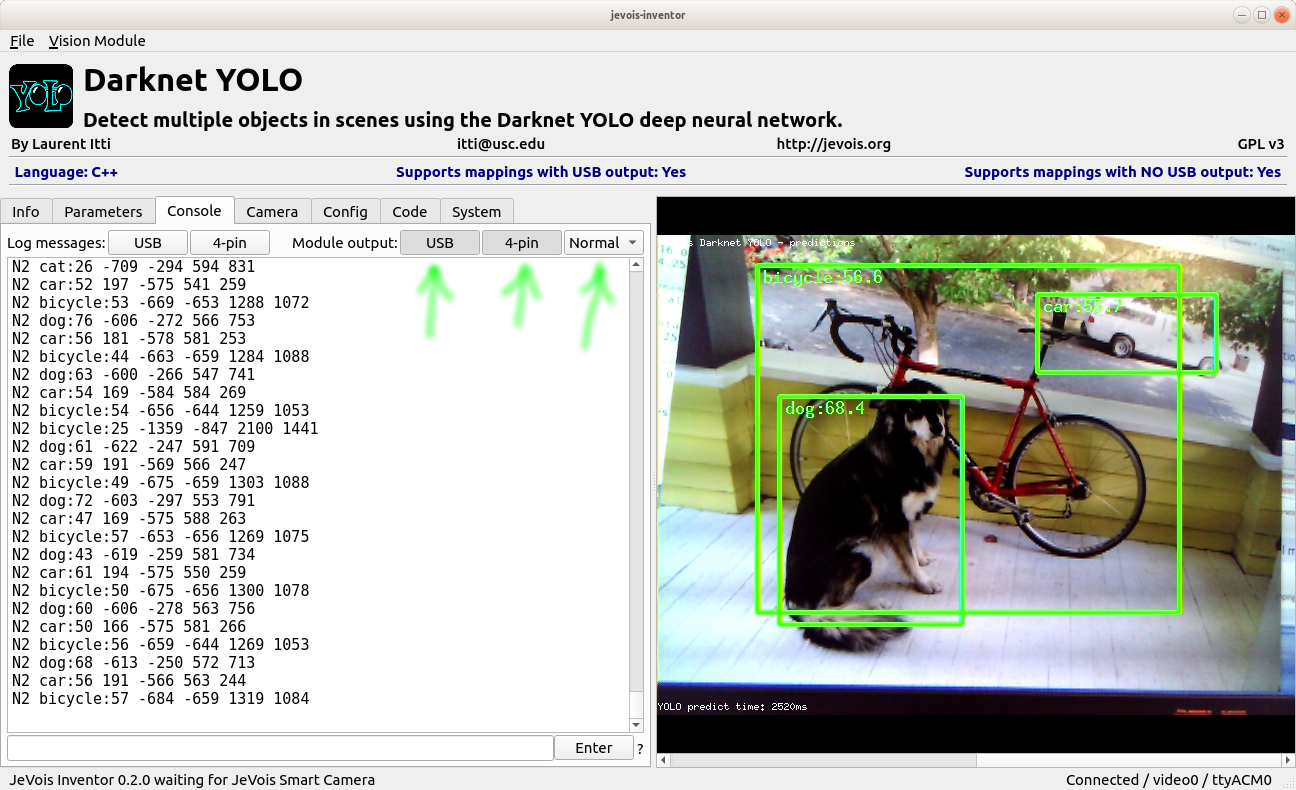
- To get a feel for these messages, let's fire up JeVois Inventor and launch DarknetYOLO. In the Console tab of the Inventor, we turn on serial messages to USB and 4-pin, and we select message detail level Normal so we get some information about each bounding box and its top-scoring object category:

- In the example above, we are detecting a dog, a bicycle, and a car on each video frame. Hence, 3 messages of type N2 are sent by JeVois on each frame. Note that here we don't know which message came from which frame. If you need to know, review Standardized serial messages formatting and look for parameter
serstamp which can be set to pre-pend a frame number to each serial message. We will not use this here.
- The messages are as follows (from Standardized serial messages formatting):
N2 category:score left top width height
Note that the coordinates are in the JeVois standardized coordinates system described in Helper functions to convert coordinates from camera resolution to standardized, where:
- center of the camera's field of view is at x=0, y=0
- left edge of the camera image is always at x=-1000
- right edge of the camera image is always at x=1000
- top edge of the camera image is usually at y=-750 (unless camera image aspect ratio is not 4:3)
- bottom edge of the camera image is usually at y=750
This is so that detections reported by JeVois are independent of the camera resolution at which JeVois is grabbing frames (e.g., 320x240 or 640x480).
- Note that by default, the floating-point precision of the standardized messages is zero digit after the decimal point, i.e., we get integer scores and coordinates. If you change that using the parameter
serprec described in Standardized serial messages formatting, you can get more precise floating-point values (e.g., try setpar serprec 3 in the Console of JeVois Inventor). For the code below, we will assume floating point values which could be integers as well.
Writing the code
We will use a state machine approach as in JeVois + Arduino: blink for X, just now it has a few more states because we have a total of 6 tokens to decode for each message.
For the sake of developing a non-trivial example, let's say we want to turn on the LED of the Arduino when we detect a dog at least 200 units wide (i.e., the bounding box around the dog should be at least as wide as 1/10th of the field of view, and the full field of view is 2000 standardized units wide as explained above).
We extend the state machine code developed in JeVois + Arduino: blink for X as follows:
18#define MIN_WIDTH 200.0F
26 digitalWrite(
LEDPIN, HIGH);
34 char * tok = strtok(
instr,
" \r\n");
35 int state = 0, i;
float score, left, top, width, height;
52 if (strcmp(tok,
"N2") == 0) state = 1;
else state = 1000;
60 while (i >= 0 && tok[i] !=
':') --i;
66 score = atof(&tok[i+1]);
70 if (strcmp(tok,
CATEGORY) == 0) state = 2;
else state = 1000;
106 tok = strtok(0,
" \r\n");
112 digitalWrite(
LEDPIN, LOW);
114 digitalWrite(
LEDPIN, HIGH);
A few notes:
- lines 1-36: The preliminaries are as in JeVois + Arduino: blink for X, except that we change the category name to dog (line 15) and we define MIN_WIDTH to be the minimum desired object width (line 18).
- lines 39-47: We decide on the various states for our state machine.
- line 52: Now we look for N2 instead of DO in JeVois + Arduino: blink for X
- lines 76-98: We decode left, top, width and height one at a time. Note that those could be floating point depending on
serprec, hence we use atof() to decode them.
- line 111: We just check that we are in state 6 (complete decoding went through, and category matched) and that the width is large enough; if so, turn on the LED, otherwise turn it off.
Compile and upload the code to your Arduino and here you go!
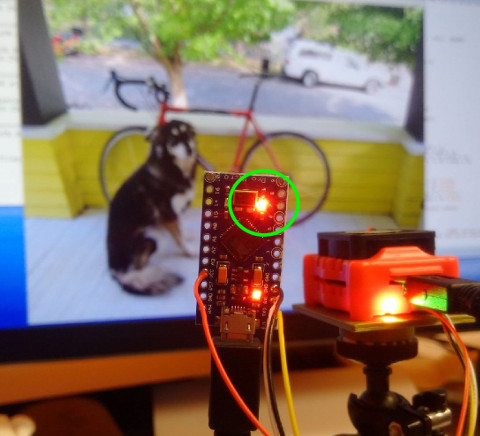
Woohoo, the LED turns on when JeVois detects a dog that is big enough!
Note that in scenes where JeVois also detects other things, the code as written will turn off the LED. So it may only briefly blink if something else is detected (e.g., the bicycle in the above scene) just after the dog is.
Going further
Check out these other tutorials. They use similar state machine decoding:


 1.9.8
1.9.8