Quick Start

Last updated: Jul 11, 2024

JeVois-A33: Take a quick tour

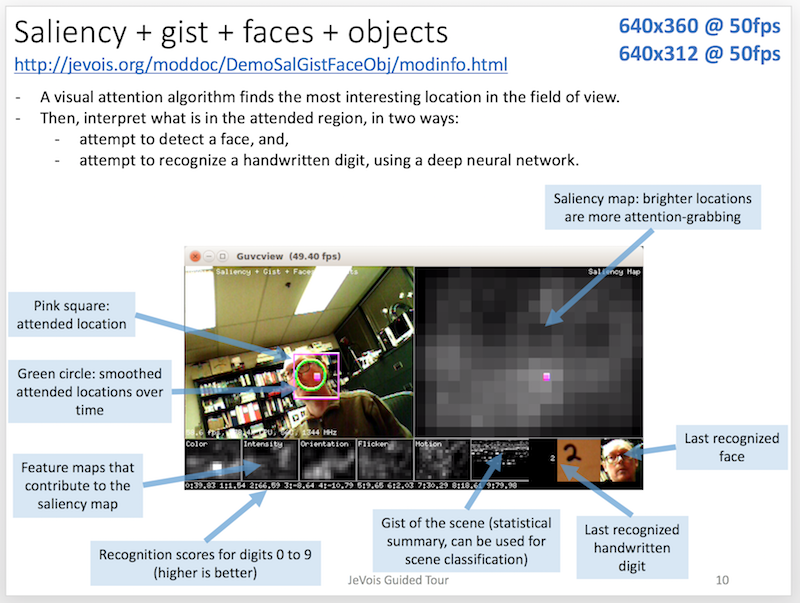
Congratulations on getting a JeVois smart camera. The future of machine vision now lies on your hands. Please take a moment to familiarize yourself with the external features of your JeVois smart camera.
Download MicroSD card image

If you have received a MicroSD card with all JeVois software pre-loaded, as part of a turnkey package, advance to Safe Handling and Inserting the MicroSD card.

All the operating system and machine vision software for JeVois resides on a MicroSD card that you insert directly into the smart camera. Download the pre-packaged JeVois MicroSD card image. This is for cards at least 8GB in size.

Download MicroSD Image

Flash image to MicroSD card

The JeVois disk image is a raw, sector-by-sector dump of the whole MicroSD card. Flash it to the physical MicroSD as you would with any raw disk image.

Ubuntu tip

On Ubuntu, to prevent Nautilus from opening 3 windows each time you insert a JeVois microSD card (which gets annoying after a while), type this in a terminal:

gsettings set org.gnome.desktop.media-handling automount-open false

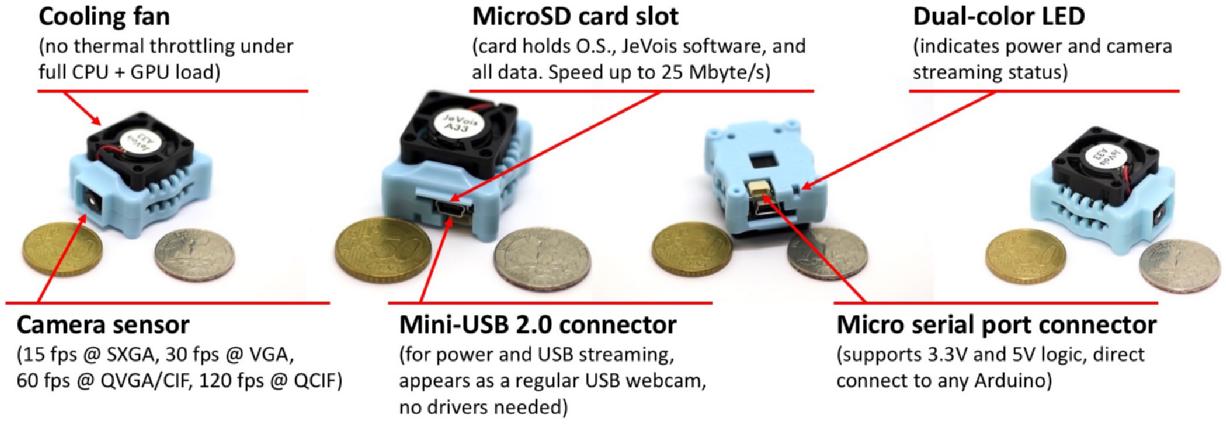
Perhaps the easiest is to use the free program Etcher from balena.io, as follows:

  • Download and install the free and open-source Etcher program. We have cached versions here:

    Etcher 1.5.18 Windows x64   Etcher 1.5.18 Linux x64   Etcher 1.5.18 MacOS
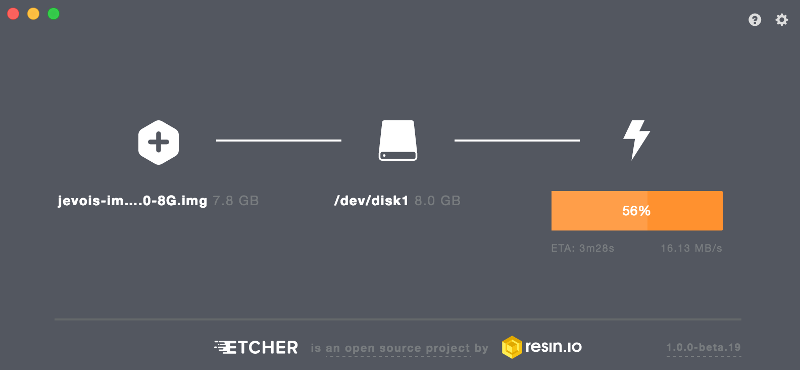
  • Attach your microSD card to your computer using a USB-to-microSD adapter or other card reader.
  • Start Etcher.
  • Select the .zip image file you downloaded, or the .img file if you have unzipped.
  • Select the drive corresponding to your microSD card.
  • Click flash and wait until complete. Your card is ready to be inserted into your JeVois smart camera.

If needed, you can also see detailed instructions here.

Safe Handling and Inserting the MicroSD card

Always observe these safe handling instructions:

  • Avoid electrostatic discharge by using proper grounding when touching the device.
  • Do not expose to rain.
  • Do not push on the center of the fan. It is held by three small prongs that can very easily break.
  • Instead, always hold the smart camera from its sides.
  • Do not disassemble. No user-serviceable parts inside.
  • Avoid liquids or moisture.
  • Do not use wet hands.
  • Consumer-grade device: Do not use in medical or life-sustaining applications, or with heavy machinery.
  • Read and understand the user manual at http://jevois.org/doc before using.
  • Dispose of the device according to your country's requlations about disposal of electronic devices.

Handle with care!

JeVois is a sensitive high-technology device. Make sure you handle it with care and be especially mindful of protecting the cooling fan and allowing good airflow that is essential for operation.

Insert the MicroSD card as shown here:

Push-Push MicroSD slot

Your JeVois smart camera features a push-push MicroSD card slot: Push until it clicks to insert it, push again until it clicks to eject it. Never try to pull on the MicroSD card. When properly inserted, your MicroSD card should not stick out of the JeVois case, but should be completely in, about 1.5mm or 1/16" past the edge of the mini-USB connector.
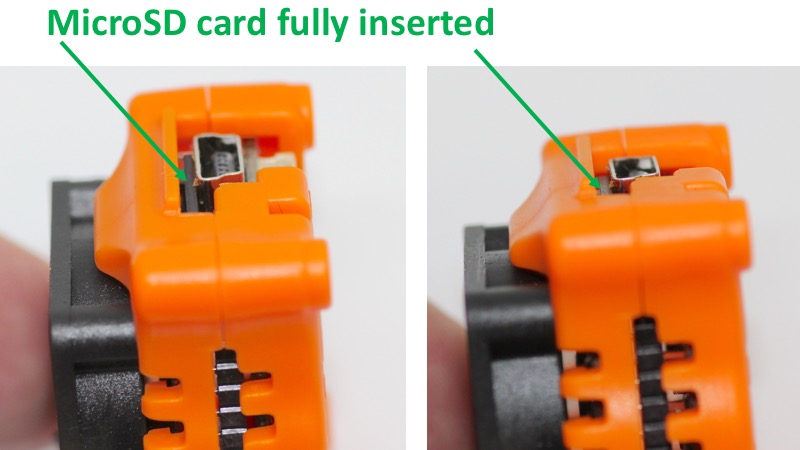
Click on the photograph above for a high resolution view.

Connect mini-USB cable and enjoy!

Connect the mini-USB cable to a host computer (desktop or laptop). Make sure you connect your JeVois smart camera to either two USB 2.0 ports (using a Y-type cable that has two USB type-A plugs for two ports on your computer), or one USB 3.0 port. For more guidance, see here.

You should see the following (exact timing depends on speed of your MicroSD card):
  • Immediately after connecting mini-USB cable, LED on JeVois smart camera turns green and fan turns on.
  • About 3 to 5 seconds later, LED briefly flashes orange. This means the operating system has correctly started and the camera video sensor is correctly detected. Machine vision software then loads.
  • About 3 to 10 seconds later, LED turns solid orange. This means machine vision software is ready to run and the JeVois camera is announcing itself as a new device to your host computer.
  • Allow a few more seconds for your host computer to detect and configure the smart camera.
Then, either: Download JeVois Inventor beta and enjoy!

JeVois Inventor is a graphical frontend for JeVois.


JeVois Inventor for Windows JeVois Inventor for MacOS
  
JeVois Inventor for Ubuntu 24.04 JeVois Inventor for Ubuntu 22.04
  
JeVois Inventor for Ubuntu 20.04 JeVois Inventor for Ubuntu 18.04

See the intro to JeVois Inventor to get started.

Or: Start a video capture software and enjoy!

For more guidance on this last step, see:
Take the JeVois guided tour

Want to discover what your new JeVois smart camera is capable of? Our guided tour will walk you through many of its available machine vision modules, from simple edge detection, to QR-code decoding, to detecting and recognizing objects in complex scenes.

Download Guided Tour              

  • Brief explanation of what each machine vision module does.
  • Example screenshots.
  • Sample images that you can show to your JeVois camera.

Try it out with your kids!

Video Tutorials

JeVois intro video from our Kickstarter campaign
JeVois machine vision mode switching demo


JeVois getting started with Linux
JeVois getting started with Windows


JeVois getting started with Mac

Included machine vision algorithms and demos

The following machine vision algorithms are included and ready to run from the MicroSD card image.

More are available, see the user documentation.

  • JeVois Intro - Interactive introduction to JeVois
    • YUYV 640x360 @ 30.0 fps
    • YUYV 640x480 @ 30.0 fps (video is flipped horizontally, for Mac with PhotoBooth, which flips video)
  • Object Detect - Object detection and matching using keypoint matching, can learn new objects live.
    • YUYV 320x252 @ 30.0 fps
  • Object Tracker - Color-based object detection/tracking.
    • YUYV 320x254 @ 60.0 fps
  • Demo QR-Code - QR-code and barcode detection and decoding using the ZBar library.
    • YUYV 320x286 @ 30.0 fps
  • Demo ArUco - ArUco augmented reality markers detection and decoding.
    • YUYV 320x260 @ 30.0 fps
  • Road Navigation - Detects road using a edge and texture analysis; from Chang, Siagian and Itti, IROS 2012.
    • YUYV 320x256 @ 30.0 fps
    • YUYV 176x160 @ 120.0 fps
    Additional modes with no USB output (select using the JeVois command-line interface):
    • Camera grabs at 320x240 @ 30.0 fps, no USB output
  • Demo Background Subtract - Background subtraction and moving object detection.
    • YUYV 320x120 @ 30.0 fps
  • Optical Flow - Fast optical flow computation using OF_DIS.
    • GREY 176x288 @ 100 fps
  • Saliency SURF - Salient region detection and identification using keypoint matching.
    • YUYV 320x288 @ 30.0 fps
  • Saliency + Gist + Face Detection + Object Recognition - Find salient objects, faces, handwritten digits.
    • YUYV 640x312 @ 50.0 fps
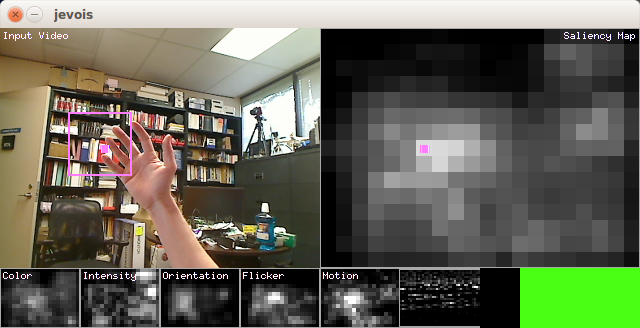
  • Demo Saliency - Visual attention using the visual saliency algorithm of Itti et al., IEEE PAMI, 1998.
    • YUYV 640x300 @ 60.0 fps
  • Demo Eye Tracker - Detect position and orientation of your pupil using the openEyes toolkit.
    • GREY 176x144 @ 120.0 fps
  • Salient Regions - Extract the most salient regions and send them out for further processing on the host computer.
    • YUYV 64x192 @ 25.0 fps
  • Edge Detection - Detect edges using the Canny algorithm from OpenCV.
    • GREY 640x480 @ 29.0 fps
    • GREY 320x240 @ 59.0 fps
  • Edge Detection X4 - Detect edges, running 4 filters in parallel with 4 different settings.
    • GREY 320x960 @ 45.0 fps
  • Demo CPU + GPU - Image filtering using 4-core CPU processing plus dual-core OpenGL-ES 2.0 shaders on the Mali-400MP2 GPU.
    • GREY 160x495 @ 60.0 fps
  • Demo NEON - Image processing using ARM Neon acceleration, comparing a box filter (blur) between CPU and Neon.
    • YUYV 960x240 @ 30.0 fps
  • Dense SIFT - Dense SIFT feature descriptors extraction.
    • GREY 128x117 @ 5.0 fps (note: slow and buggy!)
  • Save Video - Save captured camera frames into a video file.
    • YUYV 320x240 @ 60.0 fps
    • YUYV 160x120 @ 60.0 fps
    • YUYV 176x144 @ 120.0 fps
    • YUYV 88x72 @ 120.0 fps
    Additional modes with no USB output (select using the JeVois command-line interface):
    • Camera grabs at 320x240 @ 60.0 fps, no USB output
    • Camera grabs at 320x240 @ 30.0 fps, no USB output
    • Camera grabs at 176x144 @ 120.0 fps, no USB output
  • Convert - Simple module to convert between any supported camera grab formats and USB output formats.
    • MJPG 352x288 @ 60.0fps - converts from camera sensor grabbing BAYER 352x288 @ 60.0 fps
    • MJPG 320x240 @ 30.0 fps - converts from camera sensor grabbing RGB565 320x240 @ 30.0 fps
    • MJPG 320x240 @ 15.0 fps - converts from camera sensor grabbing YUYV 320x240 @ 15.0 fps
    • MJPG 320x240 @ 60.0 fps - converts from camera sensor grabbing RGB565 320x240 @ 60.0 fps
    • MJPG 176x144 @ 120.0 fps - converts from camera sensor grabbing BAYER 176x144 @ 120.0 fps
    • MJPG 160x120 @ 60.0 fps - converts from camera sensor grabbing YUYV 160x120 @ 60.0 fps
    • MJPG 88x72 @ 120.0 fps - converts from camera sensor grabbing RGB565 88x72 @ 120.0 fps
  • Burn Test - Run the quad-core saliency demo while also loading up CPU, GPU and NEON in the background.
    • YUYV 640x300 @ 10.0 fps
    Note that the BurnTest module is terminal, i.e., you may not be able to switch out of it and to something else. Just quit your video grabber software, unplug your JeVois smart camera, and start again.

See the user documentation for more!

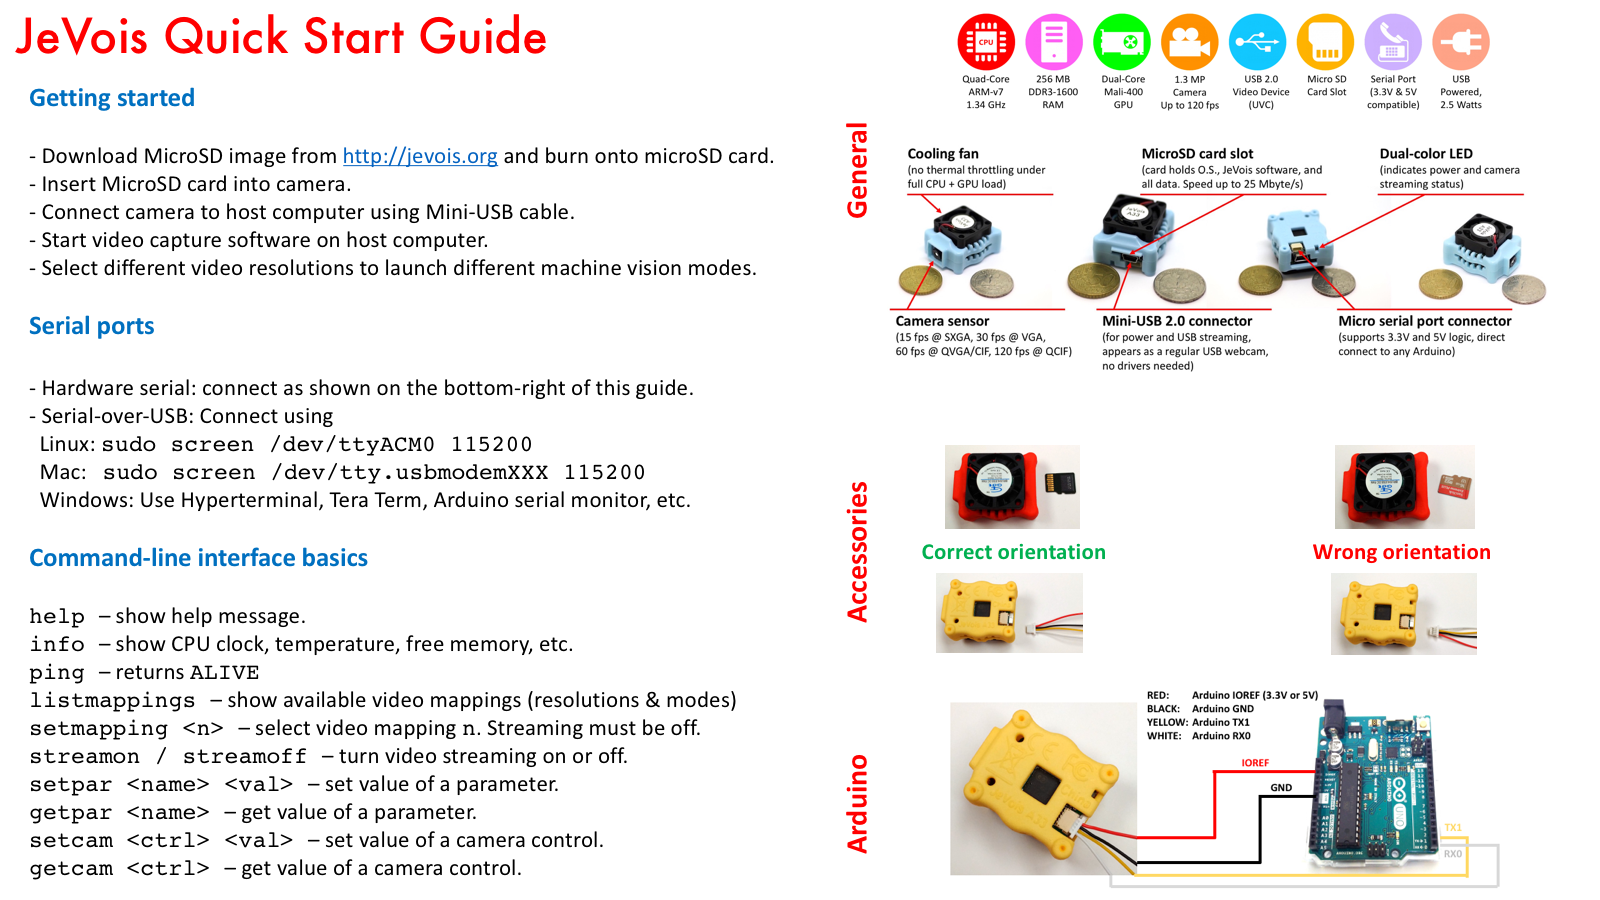
Quickstart reference card

Use this convenient quick reference card in the future:
Troubleshooting

Green LED and/or fan does not turn on

This means that there is no power or insufficient power to the camera. Check USB cable and USB port. If powering from a battery bank, check that it is charged and turned on.

Green LED and fan turn on, but LED does not flash orange and does not later turn solid orange

Power seems good but software on the microSD card is not loading. Check that card is fully inserted (see photos above). Check that software has been correctly flashed.

Green LED and fan turn on, orange LED flashes then turns solid, but camera not detected or video capture fails

Power seems ok (at least during startup) and software on the microSD card loads and starts. This suggests that the JeVois hardware is working as expected, yet your host computer fails to properly stream video from it. We have been able to reproduce this condition when using "thin" USB cables, not specified as charging+data cables, but instead specified as data sync cables, and not featuring 28/24AWG wire thickness. The critical number here is 24AWG, which means that the wires in the USB cable that carry power to the camera are thicker and can carry more current. Try a high-quality 28/24AWG or better (28/22AWG, or even 28/20AWG if you can find some; the lower the AWG value, the thicker the wires). We have had good reports with Monoprice brand mini-USB cables that mention 24AWG in their specs, available from Amazon, Newegg, Ebay, etc. For more details and pictures, see here.

More detailed guidance and troubleshooting

For more troubleshooting tips, see:

and also see the JeVois Tech Zone community forum for user tips and discussions. In particular, it seems that older Mac OSX versions may have difficulties recognizing the JeVois camera, and upgrading to the latest OSX solves the issue. Other reports of failures to start have been solved by getting better USB cables and/or more fully inserting the microSD card.

When all else fails

Just email us at jevoisinc@gmail.com and we will help you!

For more information

See the master documentation for JeVois at http://jevois.org/doc/ for more information.